29/05/2011

Pudim Caseiro, the portuguese flan


I love Portugal, or more precisely, i love Lisbon. Since the first time i stepped foot on its ground, a few years ago, i just can't help but going back. Some places make you feel like you belong there, and that's what this city is to me, a "home" away from home.

The magnificiant light, the lovely people, the human scale of the city, its architecture, its culture, the new music scene... The reasons are endless to me, and are just my own, but i trully believe there's something for everyone in Lisbon. I could talk endlessly about it, and be sure there will be a lot of post in the future related to it.

I'm learning portuguese, and on request of my classemates, i'm trying a classical of the portuguese desserts: the pudim caseiro, the homemade pudding. Like every traditional dish, there's just as many version as there are families, here's what i gathered from books, internet and a portuguese friend.

Pudim Caseiro


Serves 10-12

150gr of Sugar
2-3 Tablespoons of Water
1 bowl of Eggs (that was about 10 Eggs for my bowl)
1 bowl of Sugar
1 bowl of Milk
The Zest of Half a Lemon
2 Tablespoon of Porto Wine

Preheat your oven to 180°C.

Start with the caramel. Put the 150gr sugar in a pan with the water, don't use any ustencil, just let it bubble away, maybe turn the pan around every now and then. Wait until it gets a light brown color, and pour it into the dish you'll use for the flan. Coat the bottom and side of the dish, but be really carefull it's very hot.

Whisk your eggs together, add the sugar and mix it in. Then pour the milk in, aswell as the Porto. Grate in the lemon zest, give it a last whip before pouring into your flan dish. Cover it with an aluminum foil, and place it in a bigger dish that has water in it. Now put both in the oven, it takes about an hour to be cooked, but check it with a toothpick, it needs to come out clean.

Let it cool a little and invert it on the serving dish. It's better served cold. Here you have a bit of Portugal in a plate :)

27/05/2011

Kohlrabi, Apple and Minth Summer Salad


My sister and brother-in-law celebrated their one year wedding anniversary last week, which i find funny in a way, because it took them 11 years and 3 kids, to finally take that step. But i'm all for not going too fast, like we unfortunetly see too often nowadays.
This got me thinking about the right match, not just in life, but also in the kitchen. Some associations may look or sound weird, but in the end, they just work out.

I don't know how it's been for you guys out there, but here the summer has knocked on our doors a bit earlier than expected. Which calls for lighter and cold meals, because an oven that is on, when there's already 30°C outside, is sometimes a lot to take.
So while shopping, when i saw the cute little Kohlrabi (German for cabbage turnip), i knew that it would be part of my lunch. After browsing around on the web for some ideas, i came across a "coleslow" version with apples... Hmmm apples, why not... let's try this out!

Kohlrabi Apple and Minth Salad (adapted from a Veggie Venture recipe)


Serves 2

1 Kohlrabi
2 Apples
20 Leafs of Fresh Minth
2 Tablespoons of Nuts
1 or 2 Tablespoon of Cream Cheese (Philadelphia)
1 Teaspoon of Mustard
1/2 Teaspoon of Dried Ginger Powder
The Juice of Half a Lemon

Peal the apples, i only had Golden, but i think Granny Smith would be a better choice for this recipe, their texture is crunchier and their acid taste should work well. Grate them and add the juice of half a lemon to them, so they won't get dark.
Peal the Kohlrabi and grate it the same size as the apples. Mix them with the apples in a bowl. Chop the fresh minth and add it too.

To make the dressing, mix one generous tablespoon of cream cheese with the mustard, i prefer the one with some mustard seeds in it, then add the dried ginger. Combine it all well with a whip. Add the dressing to the Apple/Kohlrabi mixture and place it in the fridge.

In a pan without fat, put the nuts to roast them, so they are easier to peel and tastier. Once they are pealed, chop them into small bites and spread above your salad, ready to be served.

It's really nice, fresh and crunchy, it works very well together and perfect when you're sitting in your garden, under the sun with a cold drink.

25/05/2011

Tomatoes and Goat Cheese Samosas


I tend, on many aspects of my life, to swim against the mainstream. Not by choice, i'm not much of a rebel, but just by taste. Foodwise, as you may have noticed based on my recipes, i'm not a big fan of meat, which i just cook occasionally. I also don't drink coffee or alcohol, to me both are for grown-ups, which i'm not quite yet ;)

That applies to deep fried food too. First of all, i'm a clumsy person, so handling hot oil, is something i try to avoid. But also, i mostly feel it's too greasy and a bit heavy on my stomach.
Even for desserts, i rarely prepare donuts or churros, and only in small quantities. Although i love Scotland, i don't know how they came across the idea of frying a mars bar... geez.

But i think the difference of textures is very important, in the balance of a dish. Having some crunch in a crust or a paste, is lovely with a soft cheese or a smooth cream.
That's what i like about Samosas (or as the french say: Samoussas) that crunchy bite to discover a soft filling. So this is my take on them, without any dangerous deep-frying, and with an easy and tasty filling.

Tomatoes and Goat Cheese Samosas


For 4 Samosas

100gr of Fresh Goat Cheese
1 Tomatoe
2 Tablespoon of Freshly chopped Chive
2 Filo Pastry Sheet
Mustard

Preheat your oven to 180°C.

Cut the tomatoe in half, and take away the seeds. Chop it into small cubes, mix it with the chive and the goat cheese.

Take 1 Filo pastry sheet, it's normally a cercle, and cut it into 2 half. With a brush spread some mustard on it, i choose mustard with seeds, this will help to make it stick and it makes it tastier. Now fold the top of your half-cercle, so that you have a big stripe.
Put a spoonfull of the tomatoe/cheese/chive mixture on one end of the stripe, and fold it to a triangle shape. Keep folding until the end of the stripe. If that didn't made any sense, watch this video.

Put your samosas in an oven dish and with a brush, spread a bit of olive oil on them. This will help them crisp in the oven, without being too heavy. Put them in the hot oven for about 25 minutes and turn them around half way thru.

Perfect finger food for a TV diner next to a nice salad, or great as an appetizer when you have friends coming over.

24/05/2011

Lemon Curd, Sunshine in a Jar


I like to make marmelade and jam in the summer, to be able to enjoy fruits even thru the winter. For instance, the apricot season is always too short to me, so knowing a few jar of apricot marmelade are waiting for me in the pantry, is very conforting. The only problem, is they don't always make it to the winter... ;)

Now, this isn't exactly jam or marmelade, but i always wanted to try lemon curd. Something so british, could only work perfectly with my morning or evening tea. It's shiny color spread across a toast, a scone or a pancake is like the sun shining from your plate!

Lemon Curd (from Petit Larrouse pâtissier)


For one jar

2 Organic Lemons
50gr of Butter (at room temperature)
2 Eggs
100gr of Caster Sugar
1 Teaspoon of Cornstarch

Cut the butter into very small pieces and let it get to room temperature, so it's soft enough to work with it. Peel the zest of the two lemons, press the juice and put both in a pan.

In a bowl, beat the two eggs together, add the sugar and the soft butter, try to mix it well.
Disolve the cornstarch teaspoon in the lemon juice, add the egg/sugar/butter mixture to it, and put it on a soft heat. You'll need to to whip it constantly for about 10 minutes, until it has a creamy consistancy.

Poor it in a jar when it's still hot, let it cool and close it with the lid. This keeps for about 2 weeks in the fridge.

The perfect pick up food for all my "Ain't No Sunshine when she's gone..." moments.

20/05/2011

The Aspargus Trauma


Yes, I do have a childhood trauma, with aspargus. And no, i'm not misspelling the Asperger Syndrom, although the fact that the name is so similar, might mean there's something wrong with the social behaviour of this vegetable...

I grew up in a little town, that is famous for its aspargus. We claim to have the best ones in the world, which I will not put to a debat here. But as my father likes them so much, and diversity not being his big strenght, i had to eat aspargus 3 or 4 times a week, during the whole season, as long as i can remember. I don't even eat Nutella as often!

Now, I've moved out of my parents' house about 10 years ago, and never ever, have i bought or prepared aspargus on my own. I kept on having some, on family sunday lunch, but that was it.

So yesterday while shopping, i really wonder what got into me, when i bought some green aspargus. Well first they looked all pretty, and than at home it's only white ones, or on very rare occasion purple ones that are served. So i wanted to be a rebel (without a cause) and try out the green ones.

In case this turned out not to be so good, i thought i'd rather make something i know i like with them, and that is homemade pasta. It's my new thing lately, it gives me yet, an other excuse to put my hands in dough. And as the traditional "mousseline" sauce was way to heavy, i made up some butter pesto to go with it.

You know what, this actually works, aspargus are not that bad afterall, the green ones have an earthiness to them that goes well with butter, and pasta just make it a more substancial meal. I might do some next year again, because let's remember: diversity is so much more fun!

Homemade Pasta


Serves 1

1 Egg
100gr of Flour
about 2 tablespoons of Olive Oil

Mix the egg with the flour in a jar, until it has a crumble consistancy, put it on your working surface, and then starts the work out: you really have to knit the dough until it's smooth and shiny, which takes a good 10 minutes. Towards the end, I add the olive oil. One first spoon, and if the dough doesn't feel "elastic" enough, i add a second one.
Put in a cling film and leave in the fridge for at least 30 minutes.

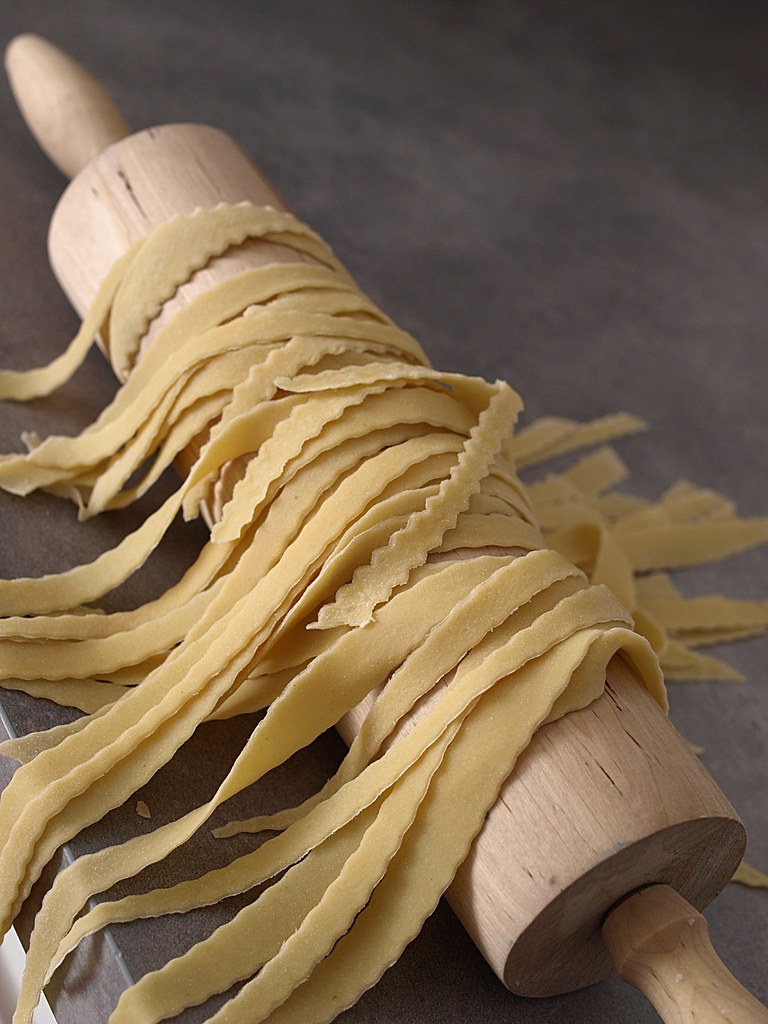
The work out is not quite done yet, because after the 30 minutes, if like me, you don't own a pasta machine, you're going to have to roll it out with our rolling pin, and it needs to be really thin, so this is going to take a while.
Add flour on the working surface, roll it out a bit, turn the paste about 25° clockwise, and roll out again, and so on and on... This makes the rolling out more even and helps you realise when you don't have enough flour, your dough will stick.

When it's thin enough, cut your pasta. I have a wavey cutter, but a knife will do. I went for a tagliatelle shape, because it's the easiest. Once cut, let them dry a little, i've spread mine on the rolling pin.
They will take about 4 to 5 minutes to be cooked in salted boiling water.

They are not perfect and even, but they are homemade! ;)

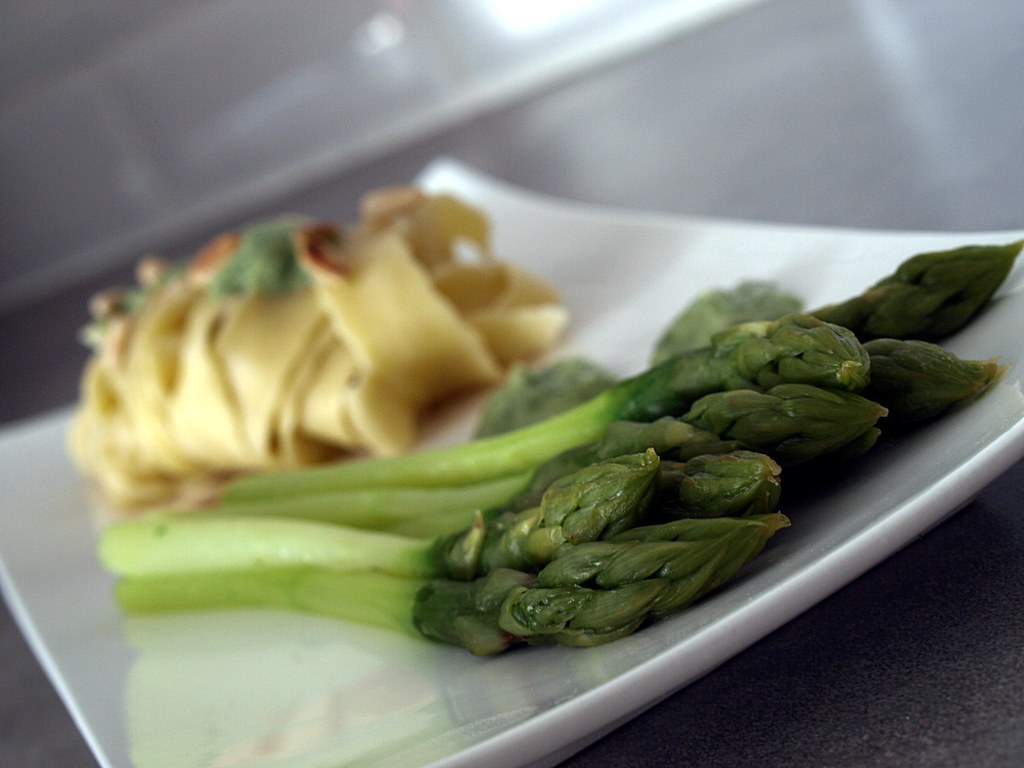
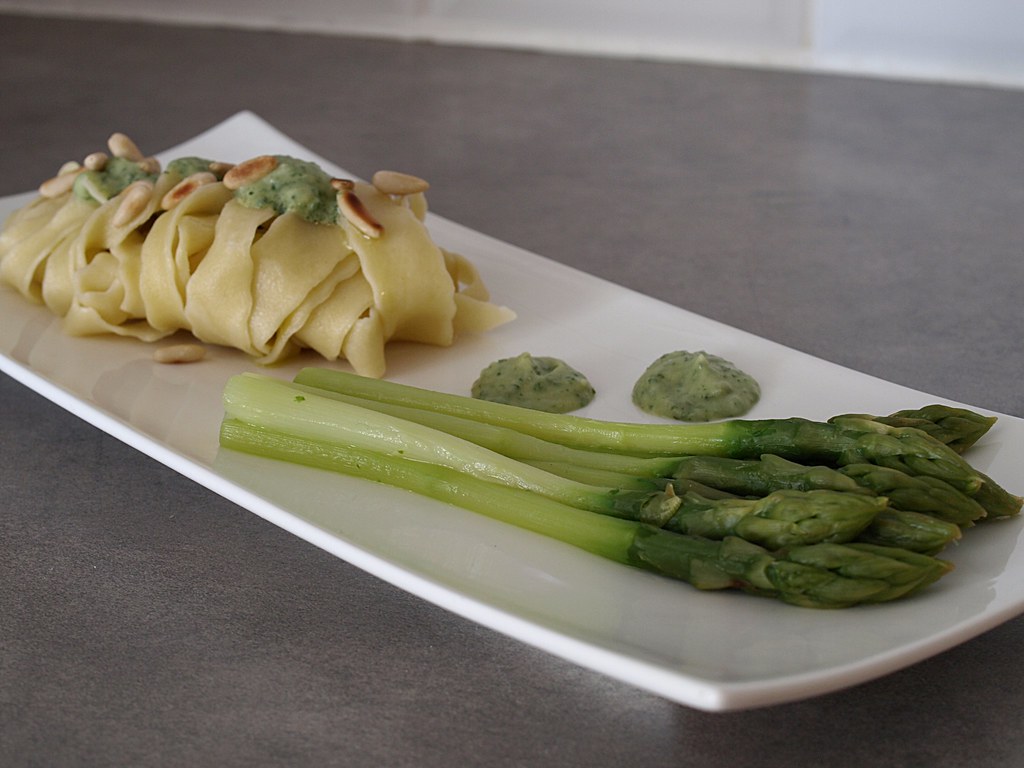
Green Aspargus with Pasta, Butter Pesto and Grilled Pine Nuts:


Serves 1

6 to 8 Green Asparguses
50gr of Butter
4 Fresh Leafs of Basil
4 Fresh Leafs of Minth
2 Tablespoon of Fresh Parsley
1 Teaspoon of Lemon Juice
1 Tablespoon of Pine Nuts
Sugar, Salt, Pepper

Leave the butter out for a while, so it's room temperatured. Chop the basil, parsley and minth into small pieces. With a fork mix it with the butter, add the lemon juice, salt and pepper to your taste.

Aline your asparguses' head, cut a good part of the bottom, so they have all about the same size. Now I personnaly peal the aspargus a little, the dark green edge around it, i guess you don't have to, but that's how I chose to do it.
Tie them up, and put them in a pan of soft boiling water that has one teaspoon of salt, and one of sugar. Don't put the lid on, and to check if it's cooked, use the tip of the knife, it needs to get easily in the aspargus, mine took about 8 minutes, but they were small.

Drain them, place on the plate with the pasta and the butter pesto on top, spread a few pine nuts that you had previous grilled in a pan with no fat. And as we say here: a güata!

19/05/2011

The Brownies Quest


Brownies are such a classical, that we should all have "our" recipe of them. I have been on that (delightfull) quest for a while, and i have to say, i haven't quite found the right one yet. So when i saw Nigella do a quick brownies recipe on her show, i thought i had to try her take on it, and give it a bit of my own twist.

Now i can't, decently, eat all of those brownies on my own, that would not be right. So let's invite a friend, because that's what they are for too: share some extra calories, so not everything lands on your hips - ass - face - belly (strike the the unwanted mentions, if there is any).

So after Mimi and I thorouly and professionaly tasted the brownies, it definetly gets a thumbs up! I'd say this is one for the chocolate lovers, because the use of dark, unswetten chocolate powder and dark chocolate chips gives it a strong taste. Maybe a few Pecan nuts would give it a bit of crunch. But's it's lovely as it is.

An evening catching up with a friend with some chocolate brownies, what else do we really need? :)

Chocolate Brownies (based on Nigella's Everyday Brownies)


175gr of Butter
100gr of "Vergoise" Sugar (or Muscovada)
150gr of Caster Sugar
100gr of Unsweeten Cocoa Powder
150gr of Flour
1 teaspoon of Bicarbonate
4 Eggs
1 teaspoon of Vanilla Extract
2 Tablespoon of Dark Chocolate Chips

Preheat your oven to 190°C and butter an oven dish, i used a 20x20cm dish.

Melt the butter, i used in the microwave, but if you do it in a pan i would take it of the fire, specially before adding the cocoa powder, you don't want it to burn.

Add both sugar to it and whisk in the Cocoa powder gone thru a sieve. Do the same with the flour and bicarb and mix well. Add the eggs one after an other, the vanilla extract and the chocolate chips to finish. Don't work too hard on it, it doesn't need to be totally smooth.

Put the batter in your dish, even the top and put in the oven for about 25 minutes. Don't over cook it, to me brownies need to stay doughy in the middle, it's not a cake ;)

As Texas and Sharleen would sing "You know i can't resist..." ;)

15/05/2011

Pain de campagne, the 7 hours bread


I have a nickname in the family, it's "the snail". Apparently my way of walking, driving and generaly going thru life is not very adapted to today's pace.
But do we really need to be this fast all the time? Do i want to eat pasta out of a carton box that are done in two minutes? Do i need to watch a TV show, while following the latest tennis result on my computer and updating my facebook status on my cell phone? Is it important to have a car that drives over 200km/h? Does it make sense to make money in the blink of an eye, and loose it a minute after? Clearly to me, no.

Now don't get me wrong, i wouldn't want to go back to my first 56K modem, or do a homemade puff pastry everytime i need one. But i believe it is a real treat to appreciate some "slow" time: seat down to read a book, taking pictures on my old camera and developping them, have tea with a friend... Once again, why not choose quality time over quantity of rushing .

Making this bread, totaly falls under that category, i could have bought one at the bakery, but where is the pleasure of putting your hands in the dough, to see it rise and than the pride of saying: i've made this myself!
From the moment you start, until you can have the first slice of it, it will take about 7 hours. But that first bite of it, is worth every minute! People, believe me, there is pleasure in longing ;)

Pain de campagne, Rustic bread (from "Pains de Tradition" Marguerite Rousseau, Flammarion)


1 big loaf, or 2 small ones

15gr of Fresh Baker Yeast (or 7gr of dried one)
35cl of Tepid Water
70gr of Rye Flour
470gr of Type 55 Flour (+50gr for the work surface)
10gr of Salt

In a jar, put 10gr of fresh yeast (5gr of dried one). Add 15cl of tepid water to disolve the yeast, put the 70gr of rye flour, aswell as 70gr of flour and mix well together. Put a clean cloth on it, and let it rise for 2 hours.

In a big bowl, put the rest of the yeast and the 20cl left of teppid water. Add the 400gr left of flour aswell as the salt, and mix it. Then, add the yeast mixture that has had 2 hours of rest.
Here's where you'll have to work: the paste has to become smooth and elastic, when it is, bring the dough back together in a ball, put flour on it, aswell as a cloth, and let it go for an hour.

After an hour, form your bread(s). Put flour on the tray that will go in the oven, place your bread on it and cover it with a cloth. Wait for 2 hours.

Preheat your oven at 240°C, i would advice you to place an oven dish with some water on the bottom of your oven, for humidity.
When the oven is hot, cut the top of the bread with a sharp knife in a cross pattern, and put it in the oven. After 10 minutes, lower the oven to 220°C and leave it for about an other 25 minutes.

Let it cool on a rack before cutting your first slice, and enjoy it!

12/05/2011

One artichoke, two sauces


I unfortunately never got to cook with my Grandma', but one of the image i keep in mind from her, it's her standing in front of her stove, wearing one of her flowery apron, stiring in a couple of pans.
No matter if it was a big sunday lunch or a just a regular week day meal. As every grandmother's cooking, i remember hers as being rich and tasty, she didn't care about anything being low fat, she knew (unlike me) what was in season, and past on her wisdom to my mum.

I kept all her cook books, because i love cook books in the first place, and i like finding recipe she used to do and take inspiration from them. I will show you some in future posts, the books are mostly from the 70's, very retro and kitsch, therefor so trendy!

Yesterday night i picked one up "BOCUSE, Die Neue Küche" (yes, most of my Grandma's book are in German), Almost 500 pages, from 1977. I was looking for a vegetable recipe, so i browse thru the index and found Artichokes with sauces. Artichokes are in season, so that's a good point, and for the sauces in the book, they were all based on butter or cream... a bit heavy for me.

So i decided to do a mayonnaise (not much lighter, i give you that) the regular kind, and i found on the internet that you can do one just with the egg white, i got intrigued, let's try both out!

Artichokes with two mayonnaises


Serves 2

2 Artichokes (i would advice you to take the smaller ones, they are more tasty to me)
1 Egg
1 Tablespoon of mustard
1 Teaspoon of lemon juice
8 Tablespoon of Oil
A few drop of Piri-Piri sauce (or Tabasco)
1 Teaspoon of Fish sauce
1 Teaspoon of Honey
1 Teaspoon of Vinegar
Salt, Pepper

The artichokes:

Break the stem and cut of the first leafs around it, than cut out 1/3 of the top and clean them under the water. Tie a string around them so it won't open when you cook them. Bring water to the boil in a pan, take it off the fire, and put the artichokes in it for 10 minutes, with the lid on. This is suppose to take away the bitterness, says Mr Paul.
I used then a steam cooker, put the artichokes for about 35 minutes in it. To check if it's done, turn the artichoke around, if the knife goes easy into the stem, it's ready.

Regular mayonnaise:

Put the egg yolk in a jar, add the mustard, salt and pepper to it, mix with a whip. When it's combined, add a bit of oil for the start, and then add some more gently as you keep on whipping (i'd say about 4 tablespoons should be enough). When you're done, add the teaspoon of lemon juice and put it into the fridge.

Egg white mayonnaise:

Put the egg white in a jar, and whip it until it's white with a foam consistance, than start adding the oil (about 4 tablespoon aswell). As you can imagine, it's almost tasteless, so i added a few drop of Piri-Piri sauce, a teaspoon of Fish sauce, a teaspoon of honey and a teaspoon of vinegar.


I'm not convinced on the egg white mayonnaise, it has a nice light consistance, but i guess i wouldn't call it a mayonnaise. Otherwise, with artichokes i'd advice an oldy but goody: the gribiche sauce, which is a twist on the mayonnaise because you do it with cooked yolks, and add capres and gurken in it.

09/05/2011

Bread Pudding: let's not waste anymore!


A couple of months ago, i watched a documentary about reasonnable and biological agriculture, opposed to the mass production that has now taken over. But that's not the point of today's post, it's just that i've learned while watching it, that in developped countries, an average of 30% of the food product we buy, ends up in the trash!
So not only does one half of the world eat too much, while the other one is starving, but we also waste a good part of it!

Since, i was trying to pay more attention about what's in my fridge and in my pantry, in case something needs to be used soon. When i shop at the supermarket, i watch for expiration dates, i don't buy fresh products in big quantity, unless i plan to use them shortly.
Plus, we mostly have the option today, to use our freezer if we cook too much, and don't fancy having the same meal two days in a row.

So this recipe is a good way to use some stale bread, that is lying around in the kitchen. The french would most likely go for french toast, and that's delicious too, but here i've decided to be a little bit british, with a Bread Pudding. It's based on one of Nigella's recipe, but it's a "lighter" version of it, with different flavors.

Orange Flower Bread Pudding
(based on Nigella's Chocolate Chip Bread Pudding)


Serves 2

About 200gr of Stale Bread
1/2 a liter of Soya Milk (any other vegetal milk, aswell as regular milk would do)
2 Eggs
2 Teaspoon of Orange Flower Water
2-3 Tablespoon of Dried Golden Raisins
1 Cup of Hot Tea
2 Tablespoon of Light Demerara Sugar

Preheat the oven at 180°C, grease a pie or oven dish.

Prepare the cup of tea, i chose an oranged flavoured infusion, and put the dried raisins into it, to let them soak up the water and flavors for about 15 to 20 minutes.

Cut the bread into cubes, like you would do for a cheese fondue, and put them in the dish. Drain your raisins, and spread them on and under the bread.

Mix the milk with the eggs and add the teaspoons of orange flower water. When it's well combined, pour gently over the bread, and let it soak for about 20 minutes. The bread will swell up. Before putting it into the oven, springle over the sugar.

It took about 30 minutes to be cooked, but check for the top to be golden and the eggs base to be taken. It's nice hot from the oven, aswell as cold.

You can use a half milk/half cream base to make it a bit "richer", but that means some extra fat and calories... life is all about choices ;)

08/05/2011

Pineapple banana coconut crumble


Crumble is a favorit in my family sunday's lunch, it's very versatil and can adapt to every season, plus it's a good way for the kids to eat fruits, we all know that can be a challenge sometimes.
This will belong to the "almost instant gratification" category, you can have a lovely dessert on your table under an hour!

I'll be talking at some point about the "perfect pantry", that i don't have yet, but that i'm working on, to be able to make a great meal anytime you want, without having to run to the supermarket. The crumble is a perfect pantry dessert, you'll obviously need the fruits, but the topping should be elements that are inside your cupboards and fridge at all times.

Pineapple Banana and coconut crumble


Serves 8

1 Fresh Pineapple
2 or 3 Bananas
1 Tablespoon of Vanilla Sugar
100gr Butter
120gr Flour
100gr Light Brown Demerara Sugar
80gr Grated Coconut
40gr Oatmeal

Preheat your oven to 180°C, butter a pie or an oven dish.

Cut the top and the bottom of the fresh pineapple, so it's stands better on your cutting board. Cut the skin off, be carefull not to leave any dark spot on it. Cut it then in 4, to remove the central part and chop it into pieces.
Peel the bananas, and cut them about the same size at the pineapple. Mix carefully both fruit in a bowl and add the vanilla sugar. Put them into your oven dish.

To make your topping, cut the butter into small pieces and mix it with your finger tip to the flour. Add the oat meal, the sugar and coconut. Mix everything well together.
Spread in on top of the fruits, don't try to make it even, it will give more different textures to your topping.
Put it into the oven for about 25 minutes, you need to see bubbles forming aound the edges of the dish.

You can have it with ice cream, mascaporne, cream... Or like i prefer it: just coming out of the oven!


05/05/2011

Here comes the sun, and the roasted tomatoes


Spending hours in the kitchen is not a burden for me, because when i do, i chose to. I mostly do so to bake, make desserts or breads, because that's what i like the most. Otherwise, i will only take time to cook a more elaborate meal, when i'm on a day off work.

But that doesn't mean i'll settle for something tasteless, out of a can or a box. I've got to tell you, i'm amazed everytime i go to the supermarket, when you see all the "ready to pop in the microwave" meals people buy! Not only am I not sure of what's inside of it and how it tastes, but it's really pricey!

Here's a cheap, easy and tasty recipe. I chose the Bull's heart tomatoes because they have more flesh, but any other would do. This goes perfectly with just some pastas, a toasted piece of bread flavored with garlic, or as a subsitute to tomato sauce on pizza.

Happiness is that easy sometimes ;) Enjoy!

Roasted Tomatoes


Serves 1

1 or 2 tomatoes depending on the size
1 branch of fresh tym
1 branch of fresh rosmarin
2 tablespoon of olive oil
1 tablespoon of balsamico vinegar
salt, pepper

Preheat your oven to 170°C

Clean your tomatoes, cut them into slices of about 1 cm and spread them on your baking tray with parchement paper on it.

Chop the thym and rosmarin, sprinkle them on the tomatoes, aswell as the olive oil, the balsamico vinegar, the salt and pepper.

Put it into the oven for about 30 minutes. To serve you can add a good olive oil on top, and you have a preview of the summer on your plate.

03/05/2011

Fennel with anchovy and herbs oil


So after a couple of sweet and lushious desserts, here's one of the ideas that "back to basics" is also based on: following the seasons!
This is actually a personal challenge for me. I'm in my early 30's, i belong to the "supermarket" generation, where everything is miraculously available all year thru. Now, i know that having strawberries in december is not right, that summer comes with tomatoes and cabage is in the winter, but beside that...

If you give it a thought, nature does make it in a smart way: with all the delicious and tasty sweet fruits in the summer, aswell as lighter vegetables, that we can enjoy under the sun. And on the other hand, more conforting food in the winter, to keep us warm with turnip or pumpkin soup, or give us energy with oranges.

Not to mention, you are going to enjoy a fruit or vegetable at it's best, not some tasteless strawberries that flew from a distant land, with a carbon footprint we don't want to leave.
We don't need to have everything all the time. There is pleasure in longing and following the rythm of seasons. I believe it's better for us, aswell as for the planet.

So if you have the chance to have a farmers market near you, i could only advice you to go and check it out, see what's on the stands, ask the farmers if you have a doubt about something. I think just seeing the fruits and vegetables is inspiring, it makes you want to try things out.
So this recipe has only little ingredients but is delicious, it's based on fennel, that you should have now, because the month of may is the end of it's season.

Fennel with anchovy and herbs oil (adapted from a recipe found on http://www.altergusto.fr/ )


Serves 1

1 bulb of fennel
1 table spoon of nuts
1 garlic clove
2 anchovies from a tin (preserved in oil)
1 branch of rosmarin
3-4 tablespoon of olive oil
1 branch of (possibly) fresh thym
1-2 tablespoon of black olive (pitted is easier)
Salt, pepper

Heat your oven to 180°C
Clean the fennel, cut it in two, lenghtways, and each half in two again. Cut the base off, aswell as the white part attached to it. Spread them out on a roasting tin, put some pepper, salt and olive oil on top, cover them with an alumunium foil to go into the oven for about 1 hour, to 1 hour 30 minutes depending on the size of the fennel. Use a knife, it should pass thru the vegetable easily when it's done.

In the meantime, roast the nuts in a pan with no fat. When the skin is cracking, put them on one half of a towel, fold the other half on it, and rub the nuts into the towel to peel the skin off. You can do it between you hands, but be carefull it's hot!
If you have a mezzaluna with an adapted cutting board, put the roasted nuts on it and chop them into small pieces. Put that in a mortal, then chop the rosmarin with the mezzaluna and add it to the nuts.

Press the garlic into the mortal, cut the anchovy in a few pieces and add it to the rest. Now try to mix everything into a paste inside the mortal, when you think it's fine enough for your taste add 1 or 2 tablespoon of olive oil and mix.

When the fennel is cooked, spread the anchovy and herbs oil on it, put some fresh thym, and the black olives that are chopped into cubes. Voilà!
This can be served as a side dish, but i like it on it's own. You can change the nuts to walnuts or pin nuts, the anchovy can be replace with fish sauce, and for the herbs, anything you like could do the trick.

02/05/2011

Pavlova with banana cream and strawberries


I have the pleasure to share my kitchen with Nigella, not the real one unfortunatly, but I've named my kitchenaid standmixer after her. It's gorgeous and very helpfull in the kitchen, so it made all the sense to me, to give her a little tribute. Even though the pavlova is a traditional dessert, i always relate to her version of it.

I wanted to try out this recipe for a while, and the tradition here is that whoever has it's birthday, can choose it's birthday cake. So when my brother-in-law told me he wants something with meringue, i thought it was the perfect opportunity! Strawberries start to be in season, and i asked the birthday boy which fruits he also likes, banana it is.

So instead of the whipped cream topping with fruits, i've decided to make a banana cream and top it with just the strawberries. I'm sure Nigella Lawson wouldn't agree with my organised placing of the fruits, but i'm willing to take the risk of her coming around and kick my ass about it ;)


The meringue base (adapted from Nigella's prodigious Pavlova)

6 eggs white (i took 7 because mine where small)
a pinch of salt
300gr caster sugar
2 teaspoon of cornflour
1 teaspoon of vinegar, i used raspberries wine vinegar
a few drops of vanilla extract

Preheat the oven at 180°C
Put your eggs white in the bowl of a mixer with a pinch of salt (or a dash of lemon juice), start on a low speed, you need to add air to your egg white. Increase the speed slowly until your meringue is stiff, then add slowly the sugar, a little bit at a time while whisking.

Add the cornflour, the vinegar and the vanilla to the meringue and mix it in gently with a spatula. Put a few drops of meringue under the backing sheet so it doesn't move.
I've traced a circle of 24cm with a cake tin so that it's easier to make it into something round. Pour the meringue in the middle, try to make a circle and even the top and edges without working it too much. It needs to be high and generous.

Put it into the oven and lower it directly to 120°C. It should take 1 hour to 1 hour and 15 minutes, personnaly i've left mine a bit longer, but you have to know your oven.
When it looks crisp on the outisde but it's still soft to the touch, it should be ready. Turn the oven off, open the door, and let your meringue cool there.

The banana cream

25cl of crème fraiche (liquid/heavy cream)
1 teaspoon of sugar
a few drop of vanilla extract
3 bananas
half a lemon
1 tablespoon of Demerara sugar

Cut the bananas in slice, and put them into a mixer. Add the juice of half a lemon, the sugar and mix everything well together until it's smooth. Reserve.

Whip the (very cold) cream until it's almost stiff and add the sugar and vanilla extract, beat until it's holding peaks.

Add the mixed banana to the whipped cream, mix very gently with a spatula until it's combined well and put into the fridge until you'll assemble your pavlova.

To serve:

500-600gr of strawberries (i chose gariguette, but any local production will do)

Invert your meringue onto the service plate and peel the backing sheet slowly off. Put the banana cream on top and try to spread it evenly.

Wash the strawberries BEFORE cutting off the top, otherwise they will get watery. Place them on the banana cream in the fashion that seems you the most suited.

It's ready! It should serve 10 persons, and believe me, it did!


This is a few minutes after been served, i didn't even have the chance to take a picture of a slice, which is a good sign i guess. It's a fantastic dessert, the meringue is airy and soft, it's based on simple ingredients and is very tasty.
It's been a must, i'll definetly have to do it again!

01/05/2011

Chocolate is the answer...


...to everything, at least to me. I've battle with weight as long i can remember, trying out too many diets. But here's the scoop guys: there is no miracle diet! There's only learning to eat right and in a balanced way. And that's how i managed to loose 10 BMI points in a couple of years.

I don't think we should forbid any ingredient in our diet, even if we have to be carefull with some. My personal sin is chocolate, i'm a proud cocoa-addicted, so when years ago a nutritionist told me i shouldn't eat any, it was even more tempting (remember Eve and the apple...).

Frustration can't do you any good, eat everything with measure and measure everything you eat, or at least compensate it in an other way, like going for a run or a swim.
So here's a first recipe, a pretty and tasty cake, with a moist sponge cake. To enjoy chocolate, to enjoy food, to enjoy life, that's the whole point!

Chocolate battenburg cake


(based on the recipe from « best-kept secrets of the women's institute CHOCOLATE » by Sîan Cook) Serve 8-10

115gr soft butter
115gr sugar
2 eggs, beaten
100gr ground almonds
110gr flour
1 teaspoon of yeast
2 tablespoons of unsweet cocoa powder
1 teaspoon of vanilla extract
45ml soya milk
3 tablespoons of tangerine marmelade (could be apricot too)
225gr of marzipan
powder sugar for dusting

Preheat your oven at 160°C, and grease  and line two, if possible identical, loaf tins.

Mix the butter, sugar, eggs, almond, flour, yeast and vanilla together, preferably with a stand mixer to make it smooth.
Separate in two, incorporate the cocoa and 30ml of milk to one, and the other 15ml of milk to the other and mix well.

Each mixture goes into one loaf tin, try to spread it and make a cut in the middle so it rises evenly.
This should go in the oven for 30 minutes, check with a knife, it needs to come out clean.

Now starts the complicated part, i would advice you to leave the cakes in the fridge for a while, so they won't break as easily.
You need to cut each cake in two in it's length, and then try to trim them and make them even. I've cut one, and than used it as a « pattern » for the other.
Roll out your marzipan in a rectangle, big enough to go around your cake completly.

Heat the marmelade until it gets to be liquid, and using a brush put a layer on the marzipan, add the a first layer of cake, one white, one black, pour some more marmelade on it (like a glue) and add the second layer of cake, opposite to the first one, to give it that « chequerboard » look. Finally a little more marmelade and it's time to wrapp it, like a blancket around.

Let it cool a little and trim the edges with a sharp knife.
There you have, your pretty and delicious cake! Dig in:

Introduction

Food and fotography, those are the two reasons why i'm here, and most likely why you ended up here too.

I'm an enthoustiastic baker and a decent cook, i love being in the kitchen and try out new recipes and technics found in books, or over the internet. This is one of the reasons why i'm starting this blog, a challenge to myself, a will to share recipes, experiences and images.

As an amateur photographer, « Back to basics » was in the first place, an idea of a photograpic serie i started: making shots of a single ingredient or ustensil, that i use in my kitchen. But it grew into something more global: enjoying the little pleasures in life, aswell as being more responsible toward nature.

I'm a european citizen, a chocolate-addict, a recovering obese, a bad musician, a careful driver, an optimistic mind... Join me if you like, this is me, going back to basics.


PS: I chose to write in english, but this blog might switch to french, german or (bad) portuguese for some posts.