31/12/2011

Wrapping up 2011 with some Beetroot Tatin


I'm not big on new year's eve, if it was up to me, I'd stay home and fall asleep in front of my tv, most likely before midnight. But I do like the idea of a new beginning, a new start. It's the end of a cycle, the time to reflect on what happened, but also to look forward to something new. I know it's a bit silly, but I still like to take some resolutions, hoping to improve in the new year.

One of the good things in 2011 for me, was starting this blog. I've always been baking and cooking, but blogging about it made me more curious, more interested about food and what revolves around it. Reading books, articles, magazines, paying attention to what every season has to offer us, this is what I had fun doing, and will continue to next year.

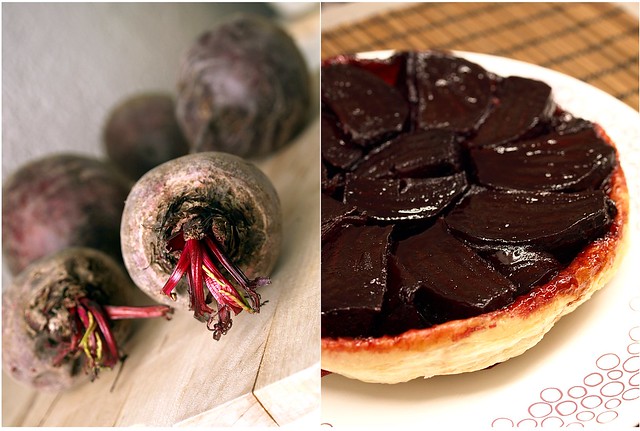
So let's finish the year on a celebration, well just a tiny personal one and related to food, obviously. As said, trying new things or experimenting is part of the fun, and I've given a childhood bad memory an other try: the beetroot. Turns out it was worth it, not only is it a very healthy vegetable, but it can actually be good too!

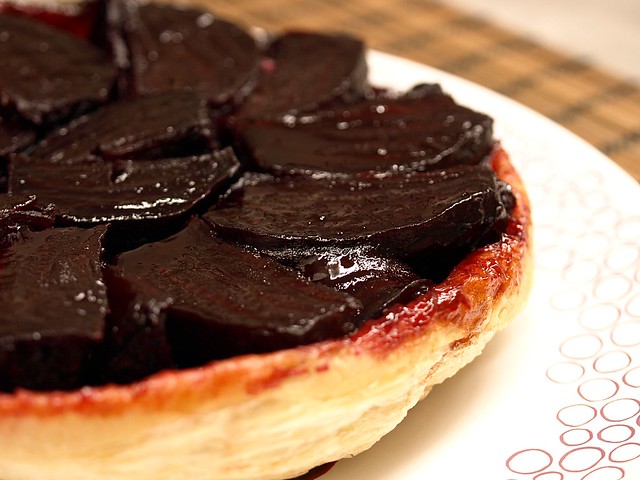
It makes sense to pick a recipe from one of my favorit book of the year "Bryn's Kitchen", and his beetroot tatin. I was afraid that the very little ingredients and seasoning was not going to be enough, but the caramelized beetroot are delicious, it was worth the burns on both my hands (gosh I don't like making caramel!).

I wish you all a very happy new year, I hope 2012 will be filled with joy, love, health and good food!

Beetroot Tatin (from "Bryn's Kitchen")


Serves 2

3 Beetroots
200gr of Rock Salt
70gr of Butter
70gr of Sugar
100gr of Puff Pastry
1 Egg
Flour, for dusting

Preheat the oven to 180°C

Line an oven dish with rock salt. Wrap each beetroot in aluminium foil and place them in the dish. Bake in the oven for 1 hour and a half.
When you take them out of the oven, leave them in the foil to cool, it will make it easier to peel them.

I would advice you use some rubber gloves to peel and cut the beetroot, as the color is quite hard to wash off. Peel them and depending on the size, cut them in 4 or 6 parts.

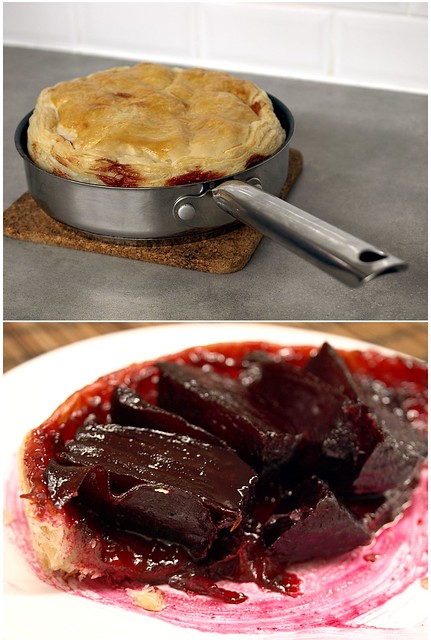
Use a frying pan (about 20cm) that you can put in the oven. Cut the butter into slices and try to cover the bottom of the pan with it as evenly as possible, springle the sugar on top.
Now place the pan on a medium heat, until you have light golden caramel. Carefully try to place the beetroot, going around like you would for an apple pie.
Take the pan away from the heat and let it cool.

On a workface dusted with flour, roll out the puff pastry. Cut a circle that is a bit larger than the pan. Place in carefully on top of the beetroot and tuck in the excess pastry. Beat the egg slightly, and brush the pastry with it.

Now place in the oven for 40 minutes, but check the color of the pastry every once in a while, it needs to be nicely golden, and you can see some beetroot caramel on the sides aswell.

When you take it out of the oven, invert it on you serving dish, but be carefull as the caramel is really hot at this point.

29/12/2011

Thanks to Santa: Whole Wheat Raviolis


Santa has been very kind to me, he got me something, or more precisely, he got something to Nigella, my Kitchenaid: a pasta maker! I'm no jewlery kind of girl, but this shiny piece of equipment has putted little stars in my eyes. It contains one pasta roller, to roll out the dough as thin as possible, a fettucini or tagliatelle cutter (haven't really measured it) and a spaghetti cutter.


It takes a bit of practise to get the hang of it, but it's really fun and efficient to use. So after the first time trying it, I would advice you not to do too much at a time, I'd say about 60gr of dough is enough and it will stretch out quite a bit in the end.
For having rolled out my dough with a pin for a while now, I have to say the result is better with the machine, but that also may be because I don't have the upper body strenght of an italian mama.


And to stay on the healthy side before having to party again this week-end, I thought I'd try whole wheat pasta for a change. It is also a vegetarian recipe, in case christmas brought too much roasts or big birds on your plate that you can handle.
I've only used 1/3 of the pasta dough for this recipe, but I've made tagliatelle with the rest of the dough. If you let them dry you can keep them a few days in the refrigerator or longer in the freezer.

Whole Wheat Raviolis with Herbs (based on "Vegetarische Küche" Bassermann 1997)


Serves 2

For the Pasta:
250gr Whole Wheat Flour
1/2 Teaspoon of Salt
1/2 Teaspoon of Nutmeg
2 Eggs
2 Tablespoons of Olive Oil
2 Tablespoons of Water

For the filling:
50gr of Butter
1 Big Onion
3 Tablespoons of Parsley, chopped
2 Tablespoons of Chives, chopped
100gr of Bread Crumbs
1 Egg
Salt, Pepper

Also:
1 liter of Vegetable Broth
1 Egg Yolk
20gr of Pecorino Cheese

Put all the ingredients of the pasta dough in the bowl of the kitchenaid with the dough hook, and slowly combine. When it has a crumble consistency, tip it on your worksurface and work the dough until it forms a ball that is smooth and shiny. Put it in a clingfilm and leave it at least 30 minutes.

In a heavy based pan, on a low heat, warm up the butter and add the finely chopped onion, let them get transparent. Add the herbs and the bread crumbs.
In a bowl, break the egg and beat it lightly, season it with salt and pepper. Add the beaten egg to the pan and keep stiring so you dont have an omelette. Set aside to let it cool.

Roll out the dough (as said above, I only used 1/3 of the dough) to two long stripes. Place four tablespoons of the herb mixture on one stripe, leaving enough space in between to make four big ravioli.
Using a brush, cover the area around the herb mixture with beaten egg yolk, so you will be able to seal the raviolis more easily.
Place the second stripe of dough on top of the first one, and press it down around the filling first, then toward the edges to seal them together. Now separate the four raviolis with a knife or a wave cutter, place them on a floured surfaced for the moment.

In a big pan, heat up the vegetable broth (you can also use chicken broth if you prefer). When it's close to the boil, place the raviolis in the broth and let them cook for 4 to 5 minutes.

Serve them in a soup bowl with a bit of broth and grate some cheese on top.

26/12/2011

For the next celebration: Savory Kougelhopf


Let's face it, today I don't want to eat anything (at least not until diner time), I don't want to move much either, my couch, my TV and my DVD player are my best friends at this moment. I drunk 2 liters of tea so far, and ate 2 tangerines. It's all I need after the last two days, where meals seem to last so long that you don't know where one stops and the other starts.

I know aboundance is part of the christmas spirit, but still, 3 big meals in 2 days is a bit much to handle for me. But, I had a lovely Christmas, we had a great time, delicious meals and a fun time preparing everything. So even if the appropriate recipe for today would be something like a soup, I'm going to post something more "festive", that you can reapply for next week-end.

Because one of the problem of this time of year, is we're not quite done yet, New Year is still upon us, with it's partying and fancy diner. A classical appetizer around here on special occasions, is the Kougelhopf (or Kuglof, Kugelhupf, Gugelhopf... and oh so many ways). Based on a southern german tradition, it has many versions thru Europe.

The traditional one around here, is the sweet version with raisins and almonds, but I went for the savory recipe with speck (or bacon) and walnuts. If you don't have a stand mixer, you'll need more upper body strenght than I do, because it takes a lot of "beating" the dough. But hey, look at it the bright side, after all those family reunions, you might have some extra anger to express, and what better way to do it than baking!

Kougelhopf


For a 20 cm mould

400gr of Flour
25gr of Fresh Yeast
20cl of Tepid Milk
10gr of Salt
2 Eggs
150gr of Butter at room temperature
150gr of Speck, cut in cubes or slices (or Bacon)
100gr of Walnuts, plus about 10 whole ones to decorate

Crumble the fresh yeast in a bowl and combine it with 10cl of the milk, add 100gr of the flour and place it in a warm place until it doubles in size. It takes about 20 or 30 minutes.

Mix the rest of the flour with the eggs, the remaining milk and the salt for about 15 minutes to add air in the dough.

Add the butter, that you have cutted into cubes, little by little in the dough. Then add the yeast mixture to the dough, and work it until the dough detaches itself from the side of the bowl.

Cover the bowl with a clean cloth, and let it rise in a warm place (close to a radiator for instance) for 1 hour.

On a floured worksurface, place the dough and bring it back to it's original size, add the speck and the walnuts to the dough and work it for the minute or two to combine the ingredients well.

Butter the mould well, and place the whole walnuts on the lower part of the mould, so it would end up on top of the crown. Place the dough as evenly as possible in the mould, and let it rest until it rises to the edges of the mould.

Preheat the oven to 200°C and cook it for about 50 minutes. If the dough get too much color, cover it with a baking paper. Carefully invert the mould on a rack to let it cool down.

22/12/2011

Christmas Chocolate Truffles


Yes, it's the final rush towards christmas, and I'm almost scared to jinx myself by saying I have everything I need. I know I'll realise saturday morning, there is one (tiny but essential) ingredient missing for one of the final preparation, which means heading to the local market, facing the crowd of people, who just like me, forgot something.

But I did plan ahead this year, I even made a list of what to do and when. Obviously I've started my christmas cookies for a while, and like every year, I'm in charge of desserts. Although it's super classical, I've never done a chestnut christmas log, but I did do a tangerine christmas log a few years ago. Therefof, yesterday I did some chestnut cream, so that's ready.

I also decided to make truffles to offer this year, for a change, because chocolate feels festive and I can use any excuse to buy and work with my favorite ingredient. It was also a chance to play a little with spices, taste and textures. Depending on the chocolate you use, if you add butter or not, which spice you use, you get a totally different result.

The three variety I tried: a very classical one with just chocolate and chocolate powder, a cardamom and coconut and a 4 spicies and ground almond. Adding the butter makes them a bit creamier, but it's all about trying out what you like best. The added bonus is being able to get your hands all dirty when you forms the truffles, which made me feel like I'm about 6 years old again.


Let me use the opportunity to wish you all a merry christmas, I hope you'll get to spend this time with your beloved ones, I wish you all peace and joy.

4 Spices Chocolate Truffles


20cl of Cream
1 Tablespoon of 4 Spices Mix (Cinnamon, Clove, Ginger, Nutmeg)
10gr of Butter
200gr of Dark Chocolate (52% in this case)
3 Tablespoons of Ground Almond

Break the chocolate into small pieces and cut the butter into a few cubes. Place both in a bowl.

On a low to medium heat, heat up the liquid cream mixed with the 4 spices, at the first bubbles, pour it on the chocolate and butter, using a whisk, combine everything together. Even when the chocolate has melted, keep whisking until it's shiny. Place in the fridge for at least 3 hours (preferably overnight).

Using a small spoon, take some ganache and roll it between your hands (that's the messy part) until it forms a ball, and roll it into the ground almond. If you have some, place them in little paper cases.

18/12/2011

The tradition goes on: Spinach Stuffed Veal Breast


As any other geek, I like to follow what's going on with new technologies. I can get excited about a new camera, a faster processor or the latest app to have on your phone. But I'm also attached to some traditions, the ones from my own region aswell as the ones from my family. I speak the local dialect, I like to know about our history, but obviously my favorit part is related to food.

This recipe is from my grandma, she teached it to my mum and now my mum is showing me how to prepare it. It's very traditional from my hometown, who actually takes credit for it, I won't go as far, because they like to claim a lot of things around here. Funnily enough, I didn't like it too much as a kid, and it's now one of my favorit sunday meal.


We got a lot of spinach this week, so the timing was perfect. It requires a little bit of planning ahead, because you have to prepare it the day before, but also some sewing skills to keep it all together. The sewing part isn't really my forte, but I guess it requires some practise. It's also handy to have a standmixer with a grinder, my mum owns a Kenwood, who might not be as pretty as my kitchenaid, but does the job perfectly.

I think it's important to pass these traditions on, and I can only hope that one day I will show my nephew or nieces how to make this dish. Because beside the recipe itself, the most important thing is the time spent together in the kitchen, making those recipe ready and sharing them with your loved one. I know those memories will stay.

Spinach Stuffed Veal Breast


Serves 8-10

1,8kg Veal Breast
1kg of Cooked Spinach
400gr of White Raw Sausages
2 Onions
3 Slices of White Sandwich Bread
200ml of Milk
200gr of Whole Canned Mushroom
100gr of Semolina
3 Eggs
Salt, Pepper, Nutmeg

Day 1

Asked your butcher to cut the veal breast in the shape of a pocket, to be stuffed, but check if there is no hole, otherwise you will need to sew them.

Put the slices of bread in the milk, to soak for a few minutes.

For the stuffing, the spinach has been blanched a few minutes, put into cold water and press between your hand to remove the excess of water. Pass the spinach thru the grinder aswell as the onion, and the slices of bread where you have remove the excess of milk.

To that mixture, add 3 eggs and press the stuffing out of the raw sausages into it. If you're brave, use your (clean) hands and work the mixture until everything is well combined.
At this point, add the semolina, the mushrooms, the salt, the pepper and the nutmeg. Mix again and check for seasoning. You might need to add more semolina in case the stuffing is too liquid.

Using a spoon, start stuffing the veal breast, press the stuffing down and try to leave just a little space on top, in order to sew it together, so it's closed. Leave it over night in the fridge, it will allow the semolina to absord moisture.

If you have some stuffing left, add a bit more semolina to it and form some balls. You will be able to cook them in the sauce and serve with the meat. Leave them in the fridge aswell.

Day 2


For the sauce:
2 Onions
Olive Oil
75cl of White Wine
1 Tablespoon of Flour
25cl of Water
1 Cube of Beef Stock
4 Veal Ribs

In a big cast iron casserole, heat up some olive oil, and color the stuffed veal breast on each side, it's a bit heavy, but be carefull not to break the pocket. When it has a nice color, take it out of the casserole and set it aside. Color the veal ribs aswell, and take them out for the moment.

Chop the onions and add them to that very same casserole, add some olive oil if needed. Let them color a little and take the flavor of the roasted meat.
Now add the tablespoon of flour, and with a wooden spoon, keep stiring until it has a light brown color. Pour the white wine in, delay your beef stock in the hot water and add it to the sauce too. Let it bubble a few minutes.

Turn the heat down a little and place the veal ribs in the sauce, on the bottom of the casserole, place the stuffed veal breast on top, this will prevent it from sticking, aswell as adding flavor to your sauce.
Leave it one hour in the sauce, turn it around half way thru.

Preheat your oven to 160°C

Take the stuffed veal breast out of the sauce and place it in an oven dish, finish cooking it in the oven for 1 hour, if it gets too much color, cover it with an aluminium foil.
At this point, add the stuffing balls you have prepared to the sauce, and let them cook for an hour.

Slice it with an electric knife, serve with some sauce and traditionally with some nuddles.

15/12/2011

Eat your vegetables: Spinach Pasta


"It was the best of times, it was the worst of time..." I hope Mr Dickens will forgive me for using his words here, but that's how the end of the year has been feeling so far. Some roller coaster of emotion have been our daily bread in december, thinking about it, for the last few years actually, luckily we always got to a happy ending so far.

"...it was the age of wisdom, it was the age of foolishness, it was the epoch of belief, it was the epoch of incredulity, it was the season of Light, it was the season of Darkness, it was the spring of hope, it was the winter of despair, we had everything before us, we had nothing before us" Incredible how something written in 1859, still applies today.... In so many ways.

Christmas time remains one of my favorit time of the year. Although I can see the rush outside, to me it's a time of the year where things should be slower, where we can take our time. The snow (that is yet to fall) slows down the traffic, the days off keeps us inside, we take time with our families and we take time in the kitchen to make a special meal.

You might wonder what all this has to do with today's recipe... Well maybe not much, beside the fact that it was the first time in a while, that I took time to do something else than christmas cookies. I believe this, to be a good way to make children eat some vegetables, in case the sight of spinach makes them run away or pinch their noses.

Spinach Pasta with Soy and Morbier Sauce


Serves 2

150gr of Spinach, cooked
1 Clove of Garlic
Olive Oil
1 Egg
250gr of Flour, plus extra for dusting
10cl of Soy Cream
100gr of Morbier Cheese
30gr of Walnut

Clean the spinach and cut the stem out of the leaves. In a big pan, eat up the olive oil while you peel the clove of garlic, when the oil is hot, give the spinach leaves in and turn them around with a fork with a clove of garlic pricked at the end. Stir for 3 to 4 minutes, until most of the water has steamed out of the spinach.

In a food processor, put the spinach, the egg and start blitzing. Then add the flour and mix again until you have a dough that forms. Depending on how much water is left in the spinach, you may need to add some more flour.

Dust your worksurface with flour and tip the dough from the processor on it. Using quite a bit of flour, work your dough by hand until it's homogenous and doesn't stick too much anymore. Roll it out as thin as possible and cut into the wished shape. Fettucini is my option, because it's the easiest way to go. Let them dry while you prepare the sauce.

In a large pan, eat up salted water.

In a sauce pan, eat up the soy cream and the Morbier cheese that you cutted into cubes, stir until both are well combined. Set aside but keep it warm.

When the water is boiling, add the pasta in the water, they will be cooked quite quickly, about 2 to 3 minutes. Drain them and place them on the serve plate, pour some sauce on top, and sprinkle some walnuts that you have chopped up, eat while it's hot.

10/12/2011

Christmas + Chocolate = Basler Brunsli


I'm going to lack originality here, but I'm spending so much time in my kitchen to make christmas cookies at the moment, that it is kind of hard to focus on something else, at least kitchen-wise. Today's recipe completly belongs to the "classics", that have to be on my christmas cookie list, not to mention those are my sister's favorit ones.

There is always some chocolate somewhere in my house, in different forms, otherwise it just wouldn't be right. Now, I can start giving all the positiv aspects of chocolate, or debating about the fact that it is the "beverage of god". But the truth is: I am a chocolate addict, a cocoa-dependant, call it how ever you want, that is me.

I don't drink, I don't smoke, I don't even like coffee... But it doesn't feel right when I don't have a bit of chocolate every now and then. I even have my days where I shouldn't be trusted with a pot of Nutella. It is the ultimate confort food to me, it has actually been proved scientifically, but beside all those explanations, it just makes me feel good.

The Basler Brunsli, litteraly Basel's Little Brownies, are a very ancient recipe. Like in many other christmas cookie recipe, it's not so much about "cooking" them, than drying them out, so they preserve better. The chocolate here has to be dark, I normally choose a 70% cocoa for this recipe, but I had some "Meunier Pastisserie" chocolate at hand that I like to use too, it is sweeter, and that is fine by me.

Basler Brunsli (from "Betty Bossi Back Buch")


For about 50 Brunslis

250gr of Sugar
250gr of Ground Almond
1/2 a Teaspoon of Cinnamon
2 Tablespoons of Flour
2 Egg Whites
100gr of Dark Chocolate

Mix all the dry ingredients together (sugar, almond, cinnamon and flour) in a bowl.

Beat the 2 egg whites to a soft peak, and using a spatula, combine them with the dry ingredients.

Break the chocolate into small pieces and put them in a bowl with a tablespoon of water, put this in the microwave for 30 seconds, give it a stir and if it's not smooth yet, put it back in the microwave for 20 seconds and stir again, keep repeating until it's well combined and shiny.

Add the chocolate to the dry ingredients and the egg white, combine until it forms an homogenous dough.

Put sugar (instead of flour) on your working surface to roll out the dough, it should be about 5mm thick. Using cookie cutters with different shapes, cut out your cookies and place them on oven trays lined with baking paper.

Let the cookie dry out on the trays for several hours (or even overnight) before putting them in the oven for 5 minutes at 250°C (230° if using a fan oven). Let them cool on a rack and keep them in air tight jars afterwards.

04/12/2011

Christmas Cookie Time!


December is here! I guess I'm stating the obvious, but december tends to get me in a "jolly" mood. Yes people are running around like crazy, trying to race you on the streets or the supermarket lines, over buying, over eating and maybe forgetting what christmas should be about. Nevertheless, it's one of my favorit time of the year, one reason for this is baking christmas cookies.

I strictly forbid myself from making them all year long, beside those 4 weeks before christmas, otherwise they wouldn't be so special, and I wouldn't enjoy them as much as I do now. It is very traditional in my region, were "bredela" are one of the landmark during this holiday season. So many recipes exist, combining spicies, candied fruits, all kinds of nuts, chocolate, butter...

I have been making christmas cookies before I was tall enough to reach the top of the counter, so I have my "classics" that I make every year, but I also like to change or try new recipes. Like mostly in those situation, I turn to my Grandma's book, she knew her way with sweet things. Even if the look of them are a bit out dated, they still are a great source of information.

So one kind I choose to do "for a change" this year, are not brand new to me, I use to make them with my mother. But I haven't done them in years, maybe because they lack of the "pretty" factor. Even the name "Totenbeinli" litteraly means "leg of the deads", not very appealing, is it? But they are full of flavor and crunch, and around here, they are the most popular in the 6 sorts I've done so far, I guess there's a reason for that.

Totenbeinli, Hazelnuts Christmas Cookies (based on "Betty Bossi Back Buch" 1973)


For 2 to 3 Oven Trays

75gr of Butter, at room temperature
200gr of Sugar
1 Lemon, zested
2 Eggs + 1 White
1 Teaspoon of Cinnamon
1/2 Teaspoon of Ground Cloves
50gr of Ground Hazelnuts
200gr of Whole Hazelnuts
250gr of Flour
Salt

Cut the butter into cubes and leave it at room temperature for about 30 minutes, and whisk it (preferably with a hand or stand mixer) to give it a creamy consistency. Add the sugar to that and combine well.

Over the bowl where the butter and the sugar is, zest your lemon (buy an organic one, or wash it thorougly). Add the 2 whole eggs, the cinnamon, the ground cloves, a pinch of salt and the ground hazelnuts, mix everything well together.

Now for the whole hazelnuts, I bought mined shelled, but they still have a fine brown skin around them. To get rid of that skin, and add some flavors, we need to roast them a little in a non-sticky frying pan. With no fat, put the pan on a medium heat and add the hazelnut, toss them around until the skins cracks.
Lay a kitchen towel on your working surface and pour the roasted hazelnuts on it, possibly on one side. Fold the empty side of the towel on the side where the hazelnuts are, and start rubbing in order to get the skins off. You can also do it in between your hands, but be very carefull not to burn yourself.

Add the roasted hazelnuts to the previous ingredients, and combine well. And finally, add the flour to make it into a dough, leave it to rest for about 1 hour.

Preheat the oven to 200°C

On a floured worksurface, roll out the dough to a square or rectangle shape of about 1cm thick, and with a large knife, cut the cookies about the size of a finger. Place them on an oven tray lined with baking paper.
Whisk the egg white a little, and brush the cookies with it before putting them in the oven for 18 to 20 minutes.