27/09/2011

Tiny celebration of life: Beetroot Soup


Yes! I finally found a farmer's market that is close-by and takes place on my day off! See, my working schedule is a bit off from the monday to friday routine, so the big saturday farmer's market is not an option for me, unless I go there at dawn, which is not something I'm willing to do.

So when I read about this market, I was thrilled. It's tiny but it has all I need, including a producer from my hometown, it's a tiny world after all. So boosted about my discovery, I've decided to be brave and buy something I'm not used to, something I was really not found of as a child: Beetroot.

I remember the weird consistency that I didn't like to bite on, and the color made me suspicious as a kid. But reading recipes from "Bryn's Kitchen" lately, made me want to give it an other try. I believe our tastes do evolve as we grow, so what I remembered from my childhood might not be how I feel today.

But to avoid the "consistency" problem, I thought I would choose a soup, it's automn after all. And you know what, I really like it, it has an earthy taste, a little bit on the sweet side too. For the purpose of the picture I've added a bit of cream, but I've had some left over the next day and it's even better without the cream to me, who knew!

Beetroot Soup


2 Beetroots
2 Potatoes
1 Onion
Thym
Olive Oil
Salt, Pepper
Water

Cut the onion, and put it in a heavy base saucepan with a bit of olive oil, cook them until soft and add some thym.

Peel the beetroot and the potatoes and cut them into cubes. Add them in the saucepan, and let them cook for about 5 minutes.

Pour water to level the vegetables, and let it cook for 30 to 45 minutes. Check if the vegetables are cooked and whizz it with a hand blender or a food processor.

Pass the soup thru a fine sieve, check the seasoning, add salt and pepper to taste.

25/09/2011

Fig Tart, for a change


I don't like to cook the same thing too often, even though I have some recipes that I like to do again. I believe that new experiences in taste, texture or products is so much more interesting than eating the same thing over and over again.

I guess this is related to my "aspargus trauma", and more generaly on how my dad eats on a daily basis. He's the "I eat what I know" kind of guy, eating the same salad every evening and it doesn't bother him... I feel I would loose the will to live after a few days!


So I was very happy to found some fresh Figs, they are not something usual here, we find them easily in their dried version, but the fresh ones are harder to get to. I guess it's because I don't live in a very southern region.

And it just happened that this month magazine "Saveurs", has a chapter on figs. In sweet or savory dishes, all looking more delicious than the other. I obviously had my eye on the sugar side of things and decided for the tart recipe.

Fig Tart with Almond Cream (based on a recipe from "Saveurs" N°186)


Serves 6-8 persons

10 figs
500gr of Puff Pastry
80gr of Butter, at room temperature
100gr of Ground Almonds
80gr of Sugar
30gr of Flour
2 Egg Yolks
2 Tablespoons of Apricot Jam
40gr of Slivered Almonds
200ml of Water
50gr of Sugar
Vanilla extract

Preheat the oven to 180°C

In a bowl, mix the butter with the ground almonds, the flour and the egg yolks. When well combined, add the apricot jam aswell.

Wash the figs and quarter them.

Roll out the puff pastry to a rectangle of about 40 x 30cm. Place it on baking paper on your oven tray. Prick the pastry with a fork and spread the almond cream on top.

Place the fig quarters on the cream, pressing them down a little. Sprinkle the slivered almonds on top, and place in the oven for 25 to 30 minutes.

In the meantime, make the syrup. In a sauce pan, mix the water, the sugar and the vanilla extract. Place it on a hot flame, and let it bubble down to the right consistency.

When you take the tart out of the oven, still hot, brush the tart with the syrup and let it cool before serving.

23/09/2011

Golden Syrup for British Pancakes


"Breakfast is the most important meal of the day", we all heard that at least once in our life. I believe this to be true, specially because it's the only meal that can be sweet from beginning to end, with no bad conscious. Now, on a daily basis, I try to keep it on the healthy side: oat meal, fruit salad...

But sometimes breakfast needs to be more like a celebration, for a lazy sunday morning, to pick up your spirit or to pay tribute to a friend, who's been so cool to send you a goodies package. And this package was as good as it gets, because first it contained chocolate, and anyone who knows me, knows how much I like that, and secondly it had an unexperienced substance: Golden Syrup.

I kept seeing this in Nigella's recipes, but couldn't find it this side of the pound. Now I finally tried it, so for all of you who have no idea how it's like: it has the consistancy of honey, but it's made out of sugar so the taste is different, more like agave syrup but with a hint of caramel taste in the end. It's definetly on the sweet side, it's dense and rich, I like it!

So pancake felt like the way to go, nice and fluffy, they feel festive in my world, because I only make them, when I have enough time on my hands. I've tried many recipe and like to use more egg whites than yolks, I think it makes them lighter. Hot and topped with golden syrup, this is a great way to start the day!

Pancakes


for 8 to 10 pancakes

3 Eggs
2 Egg Whites
300ml of Milk
300gr Flour
2 Teaspoons of Baking Powder
4 Tablespoons of Sugar
Salt
Oil or Butter, for the pan

Separate the egg whites and yolks. Beat the egg whites with a pinch of salt into a soft peak.

Mix the egg yolks with the milk, then add the flour, the baking powder, the sugar and a pinch of salt, whisk and combine well.

Add carefully, with a spatula, the egg whites until well combined and let it rest for about 30 minutes.

Heat up a non sticky frying pan with a bit of butter or oil, and with a ladle, pour the batter in the hot pan. After bubbles appear on the surface, turn them around and give it about an other minute.

18/09/2011

Travelling East: Falafels


Even if my list of countries and cities I would like to visit is quite long, eastern destinations are not very present on it. I don't really know why, I'm most likely too scared to go anywhere in the middle east, and further on east requires more time and money that I have at the moment.

But that doesn't mean I'm not interested in their cuisine, obviously I like to eat chinese every now and than, and I even like to cook it myself sometimes. But for the middle east, beside the very popular Hummus, I can't say I've tried much so far.

However, I wanted to make Falafels for a while. I like chickpeas a lot, so this recipe is perfect for me. It kind of feels like a vegetarian kebab in a way. And I decided to make it all the way, so bare with me, the recipe is a bit longer than usual, because it includes the Pita bread, the white sauce and the Falafels.

Beside the pita breads' recipe taken from a book, I browsed around the internet and took ideas here and there for the white sauce and the falafels. Again, I did not go the deep frying way, which is what you are supposed to do for falafels, mine are cooked in the oven, and I liked the result.

Pitas (from "Pains de Tradition")


For 5-6 Pitas

7gr of Fresh Yeast
25cl of Tepid Water
375gr of Flour, plus extra for dusting
7gr of Salt
1 Tablespoon of Olive Oil

Get the yeast in a bowl with 5cl of Tepid water, combine well and let it sit for 5 to 10 minutes, so a bit of foam forms on top.

I used Nigella, my kitchenaid, for the dough. Put all ingredients, including the yeast, in the bowl with the dough hook. Start working slowly and increase the speed until the dough is smooth.

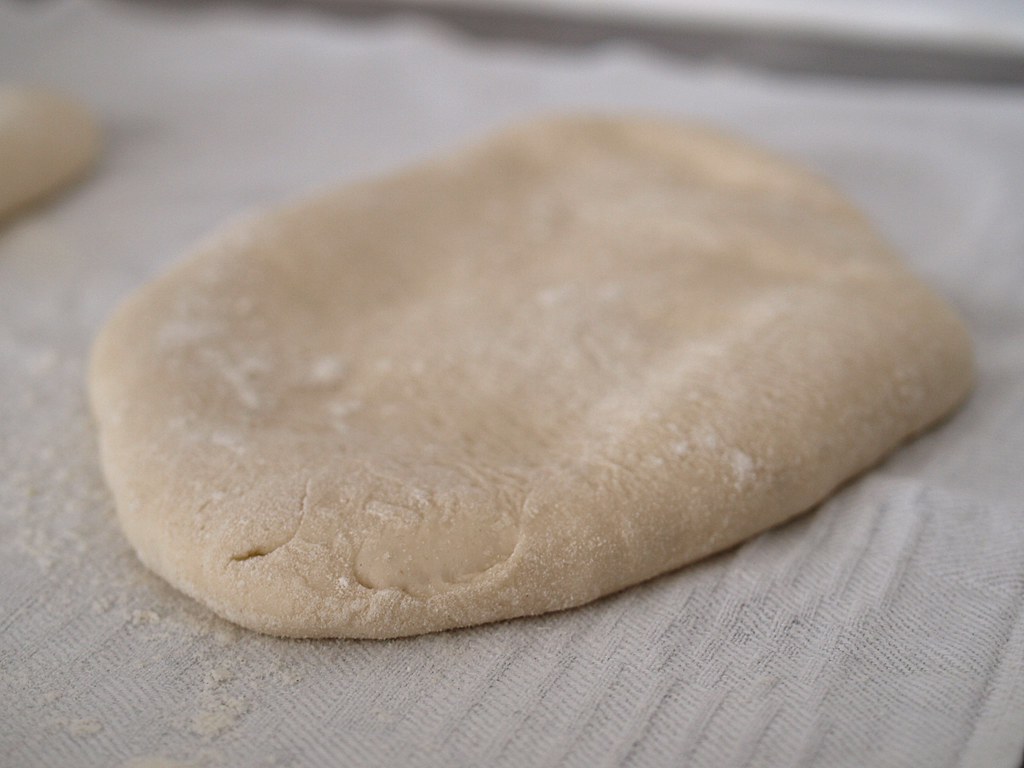
Form a ball with the dough and cover it with a cloth for 1h30.

Dust your working surface with flour and work your dough on it, separate it into 5 or 6 egal parts and roll them out to pita shape bread of about 5 milimeters thick.

Dust a piece of cloth with flour and place the pitas on it, and cover them with an other piece of cloth. Let them rise about 30 minutes.

Preheat your oven to 250°C with an oiled oven tray in it. When the oven is hot, place carefully the Pitas on the tray, and let them cook for 12 minutes.

White Sauce


1 Greek Yogurt
1 Clove of Garlic
1/4 of Cucumber
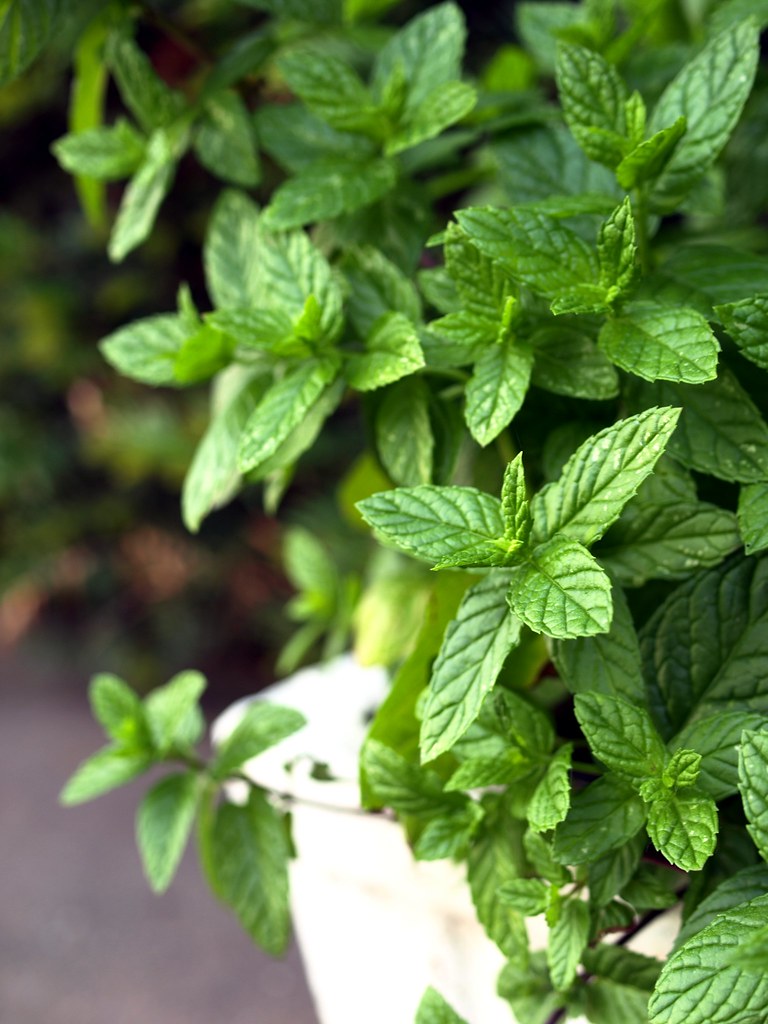
3 Tablespoons of Fresh Mint, chopped
Olive Oil
Salt

In a bowl, whip the greek yogurt a little, add the crushed garlic clove.

Peel the cucumber and take the seeds out, make small dices so it combines well with the sauce.

Add the mint, a bit of olive oil and salt, mix again and try it to see if it needs more seasonning.

Place it in the fridge until you use it.

Falafels


For 14-16 Falafels

500gr of Chickpeas
4 Cloves of Garlic
6 Tablespoons of Fresh Cilantro
1/2 Lemon
3 Tablespoons of Bread Crumbs
1 Teaspoon of Cumin
2 Teaspoons of Turmeric (Curcuma)
1 Teaspoon of Dried Chillies
2 Tablespoons of Olive Oil
Sesame Seeds
Salt

Preheat your oven to 220°C

Your chickpeas need to be cooked, so if you buy them canned you can start the recipe directly, if you buy them dry, you'll have to let them sink overnight and cook them as adviced on the package.

In a food processor, put in the chickpeas, the garlic, the cilantro and the juice of half a lemon. Blitz it to make some kind of paste.

Put that paste in a bowl and add the cumin, turmeric and dried chillies, combine with a spatula, or more easily, with your hand.

Add the breadcrumbs, the oil olive and some salt, combine again. Taste it to check the seasoning and see if you can form little balls. If it's too liquid add more breadcrumbs, if it's too dry add more olive oil.

Make balls about the size of a ping pong ball and roll them into sesame seeds. Put them in an oiled backing tray and drizzle some more olive oil on top.

Put them in the oven for about 30 minutes, try to turn them around half way thru. You can use the grill of your oven in the end to give them more color if you want.
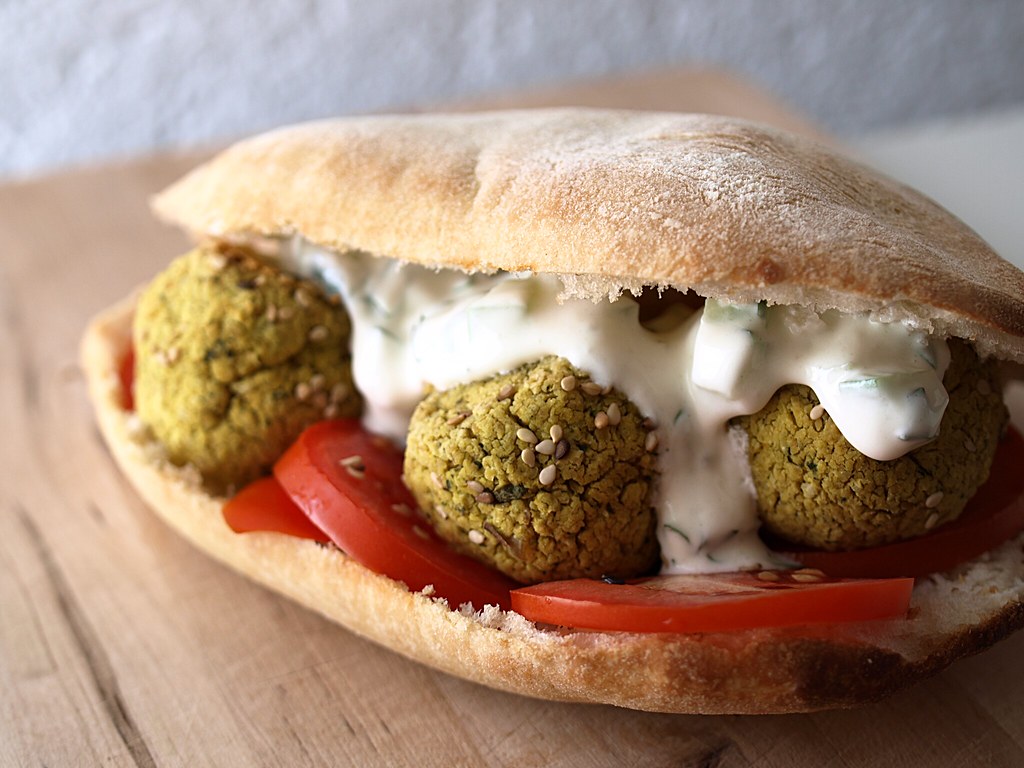
To serve

Cut the pita bread open and put the vegetables you like: tomatoes, salad, onions, cabagge... whatever you fancy.

Add the falafels on top of the vegetables and top everything with the white sauce, close your pita bread and serve it while it's hot.

15/09/2011

Red Cabagge, the cold way


We all have a different view of what a perfect holiday should be. For some it would include beaches of white sand with a clear blue ocean, for others a mountain covered with fresh snow or a city vibrant with colors and excitement.

But sometimes it's not about the destination, it's about what you can do with your free time. I just spent a week of holiday at home, which I hadn't done in years. No schedule to follow, no pressure, no need to plan visits... just relax, enjoy doing nothing but what you want to, and for me that includes cooking.


Because in the end, many of my holiday memories are related to food. I still remember the Fritto Misto I had in Italy with my parents when I was about 7, the ice cream my sister and I got every evening, when we were in south of France or the arugula and octopus salad, I had the last time I was in Lisbon.

As summer seems to be coming to an end, it seems I should post this recipe now, because it is one of my favorit summer salad. I tried it the first time on holidays last year. I know I took it from a magazine I bought, but I can't remember which. It comes in handy with my left-over red cabagge, I like the combination of textures with the cool and sweet touch of the melon.

Pasta Summer Salad with Red Cabagge, Schrimps and Melon


Serves 4-6

For the Salad:
250gr of Pasta (Oriechiette or Farfalle)
1 Tablespoon of Olive Oil
200gr of Schrimps
1 Tablespoon of Lemon Juice
1/2 a Melon
100gr of Red Cabagge, raw
Dill

For the dressing:
1 Tablespoon of Honey
1 Tablespoon of Parsley, chopped
2 Tablespoons of Orange Juice
1 Tablespoon of Lemon Juice
3 Tablespoons of Olive Oil
Salt, Pepper

Cook the Pasta in boiling salted water. When cooked, drain them and pass them under cold water to stop them from cooking any further, put them in a bowl with a tablespoon of olive oil so they won't stick together.

Mix the schrimp with a tablespoon of lemon juice. If you have a mandoline, use it to slice the red cabagge as thin as possible. Dice or ball the melon. Mix all the ingredients carefully together.

Get the ingredients of the dressing in a shaker to get them well combined, pour it over the salad, and sprinkle fresh dill on top.

11/09/2011

When passion leads you to a Soufflé


One of my personal life motto is "everything with passion, nothing with talent". Because I believe having a passion, or several, is what really thrives us in life, makes us want to move forward. No matter if we are good at it or not, the important thing is that it fulfills us.

Food and photography are two of my passions in life. I'm no Hélène Darroze or Anne-Sophie Pic, neither am I Annie Leibovitz or Sarah Moon. But that's not stopping me from cooking and shooting pictures on an almost daily basis, trying my best to improve everytime.

But a passion that predates those two, is music and going to concerts. Everybody who knows me a little, knows which band in particular I'm going to talk about: yes, it's Texas! From my teenager years, to this very day, I'm still moved by Sharleen's voice, get shivers when Ally plays the guitar and want to jump everytime I hear the intro to "Black Eyed Boy".


The prime reason I bought the book "Bryn's Kitchen" is in its dedication at the beginning of it, but it turned out to be a very good surprise. It's not an aimless series of recipe, but there's really a concept behind it, a guiding line and the chef has a point he wants to get across. So for once, music really brought me to cooking.

I know soufflé can be scary, I've had my share of dissapointment, not that much on taste, but on the look of it. From my experience, I'd advice you to be carefull when you fill it up, to make the top even and also not to take it out too early of the oven. Even if it will eventually fall back, if it's cooked properly, it will have a nice effect when you bring it to the table!

Blackberry Soufflé (Based on "Bryn's Kitchen")


For 5-6 Small Soufflés

150gr of Blackberry Jam
1 Teaspoon of Cornstarch
2 Tablespoons of Water
5 Egg Whites
25gr of Sugar
Butter for the moulds
Icing Sugar, for dusting

I only have 2 soufflé dishes, so I used coffee cups instead and it works fine. Butter them with a brush, be carefull to brush them from the bottom to the top, so it should help to rise. The book advices to dust them with caster sugar, I skipped that step, the recipe is sweet enough and it works fine without it.

Preheat the oven to 180°C.

Mix the cornstarch and the water together and add it into the Blackberry jam. Whisk it so it's well combined.

In the mixer's bowl put the egg whites with the 25gr of sugar and whisk them into soft peaks. Once it's done, take one spoon of the egg white and put it into the jam to loosen it. Now using a spatula, fold in very gently the rest of the egg white until it's well combined. (at this point you could place the mixture in the fridge for up to 3 hours before using it)

Using a spoon fill up your ramekins or dishes, even the top with a spatula or a knife. Place in the oven for about 12 minutes, until it's risen with a light shade of brown on top.

Take carefully out of the oven and dust it with icing sugar, serve immediatly to impress your guests.

09/09/2011

Color your life with green beans


I have apparently a color defining problem, I'm not colorblind though, but people keep disagreeing with me about the color of certain items I own. Like my army green sweater, that everybody thinks is brown, or my purple coffee machine that is supposebly blue... This is up to debate, who says I'm the one who's wrong after all?

Colors in my plate is something I enjoy, like the german say "Das Auge isst mit", which means something like the eye eats too. We even had color themed diners at my portuguese class, green and yellow might be fun, but when it comes to blue, you need to scratch your head a little to come up with something.

On a daily basis, it is a good thing to make our plate colorfull, not only does it make it more appealing, but a variety of colors means a variety of nutrients and vitamins. I'm not a nutritionist, so i'll let you read this article to know more about the befenits that comes with each color.


Still on a budget, I thought a pasta dish would be a good option, but preferably on the healthy side. I saw this lovely fresh green beans on the stand, and for only 70 cents I got 300 grams, it got me two meals: a nice cold salad with cumin and chickpeas, and this lovely pasta dish. And don't even think about using canned green beans btw ;)

Pasta with Green Beans


Serves 1

60gr of Pasta (like macaroni)
150gr of Green Beans
100gr of Bacon
1/2 an Onion
4 Dried Tomatoes
A Slice of Lemon
Parmesan
Olive Oil

Wash the green beans and take the ends away. Put a pan of salted water on a high heat, and when it comes to the boil, put the green beans in for 4 to 5 minutes. Take them out and set them aside for the moment.

Cut the onion and put them in a frying pan with a little bit of olive oil, when they are softened, add the cubbed bacon and let it color a little. Cut the dried tomatoes into little cubes, add them aswell as the green beans.

Cook the macaronis, and add them to the frying pan to mix everything well together. Serve on a plate with some grated parmesan and a slice of lemon.

08/09/2011

Red Cabbage, the hot way

 
I bought a new computer! Because my old one was acting up, and because the geek in me always likes a new toy :) That means I'm basically broke for the next couple of weeks. Now what does this has to do with my food blog? Well don't expect any caviar or truffle recipe these days, not that you ever should expect that here.

But that doesn't mean there's no cooking going around here, quite the opposite actually, I'm just on a tighter budget than usual. So I'm trying to use more things I have in my pantry with some less pricey ingredients.
The answers to little money is quite easy: just go for in season vegetables that grow in your area. One that I enjoy, that just starts being in season and that you can get more than one meal out of it is red cabagge.

It works raw, chopped finely in a salad like coleslow or cooked, like we often do here. This is actually a traditional recipe from my region, but it's mostly a side dish to go with red meat or game, I personally like it just like that as a main dish. And like every good old fashionned recipe, it's even better when you warm it up again.

So first, this is not really a "pretty" recipe, it's a casserole that cooks for about 2 hours, so everything combines together. And as said, I cooked mostly out of my pantry, and red wine is not something I have around, but I have a little Porto wine, so I used that instead. You can also make it all vegetarian and leave the bacon aside.

Red Cabagge Casserole


Serves 2 for a main course

1/2 a Red Cabbage
2 Apples
200gr of Chestnuts, pealed
100gr of Bacon
1/2 a glass of Porto Wine
1 glass of Water
2 Tablespoon of Cider Vinegar
Salt, Pepper, Sugar
Oil or Butter

Chop the red cabagge and cube the apples. Preferably use a stoneware casserole, put it on a medium heat with a bit of oil or butter, depending on your choice.

Cut the bacon into cubes and put them into the casserole to let them color a little. Add the apples and the chopped cabagge, stir every now and than for about 5 minutes.

Add the porto, the water and the vinegar, aswell as the salt, pepper and about a tablespoon of sugar. Lower the heat and put the lid on, let it cook for about 1 hour and a half, stir it every now and than. For the last 30 minutes, cook it with the lid off to reduce the liquid down as much as possible.

07/09/2011

Proust's Madeleine? Maybe...


In his book "Remembrance of Things Past", Proust got his memory triggered by a Madeleine that he is having with some tea, some dear childhood remembering come back to him, unexpectedly.
This passage has been so emblematic, that it turned into an expression, everybody has it's "Proust's Madeleine".

It works on many levels, I personally get my memory easily triggered by smell, odors and perfums, it can remind me of holidays in Brittany when I was 10, last summer in the south of France, or loved ones that are no longer in my life.

But culinary wise, I guess most of my Proust's Madeleine are related to my Grandma. Everytime I do the pineapple swiss roll that she used to do, not only do I think of her while preparing it, but I believe it tastes pretty much like hers, so it brings me back to those sunday family lunches we had together.

I might add the swiss roll recipe at some point, but today it's all about madeleines. I don't know if those are the original ones that Proust had, but I can understand how easily you can relate them to childhood.
They fitted in the tiny hands of my niece, when she had one yesterday, they are soft and airy therefor easy to bite on. I hope it will give her some nice memories too.

Now I have experienced some flat madeleines, so for the bump, the three things that work for me: a well beaten batter, do not put too much batter in the mold (even less than 2/3) and put them in the fridge before getting them in the oven.

Madeleine (from "Petit Larousse Pâtissier")


For about 16 Madeleines

2 Eggs
120gr Sugar
100gr of Flour
3gr of Baking Powder
100gr of Butter
1/4 of a Lemon, zested

(For a chocolate version, remove the lemon, and substitute 30gr of the flour with cocoa powder)

Melt the butter and on a medium flame, and let it cool aside.

I use the kitchenaid to make the batter as airy as possible. Put the eggs and the sugar in the bowl and using the wire whip, work it for 5 good minutes, increasing the speed until it's a light shade of yellow.

Mix the flour with the baking powder and sieve it in the egg/sugar mix, gradually and on a slower speed. Then add slowly the melted butter and the zest of the lemon. When everything is combined, turn the mixer off.

Butter the madeleine tin and fill them to less than 2/3 of the mold, put the tin in the fridge, and in the meantime, Preheat the oven to 220°C.

When the oven is hot (mine takes about 10 to 15 minutes to get there), take out the madeleine tin and put it directly in the oven for 5 minutes, than reduce the temperature to 200 for about 7 more minutes of cooking.

Let them cool a little before putting them on a rack to cool completly. Keep them in an airtight jar.

06/09/2011

The many sides of Cod Fish


There is a saying in Portugal, that there are 365 ways to prepare cod fish, one for everyday of the year. I have not checked myself, but i'm pretty sure we could get there. With all the recipe and the variations from one region to an other, even from one family to an other, we should be able to make it to this number.

It's actually not that easy to find salted cod fish where I live. I think we make it a bit complicated just with the name: when fresh, the fish is called "cabillaud" but when salted, we call it "morue". Why that is, I have no idea. The portuguese go for "bacalhau" for the salted version, and "bacalhau fresco" when it is fresh, which makes so much more sense!

I don't think I'll ever make it to the 365 ways of cooking cod fish, but I like to try one out everynow and them. Apparently one of the most popular is "Bacalhau à Gomes de Sá", which made it to the final round of the portuguese "7 wonders of Gastronomy" that will be announced on the 10th of september 2011.

I have made the bacalhau à Gomes de Sá before, but browsing thru a book, I found a recipe that looked good to me, and which I had all the ingredients at hand: "Bacalhau a nossa moda", which means something like "cod fish our way". I don't know if it's any traditional, but I enjoyed it, and it allows me to travel a little during my holidays at home.

Cod Fish with Potatoes and Tomatoes "Bacalhau à nossa moda"


Serves 1

200gr of Cod Fish
1/2 of Milk
2 Onions
3 Tomatoes
4 Small Potatoes
2 Tablespoons of Flour
Olive Oil
1 Tablespoon of Fresh Parsley, chopped
Salt

If your cod fish is still salted, you have to put it in water for 24 hours, changing the water a few times. When it's done, take away the skin and all the pin bones you can, and put it in milk for 2 hours at least.

In the meantime, chop the onions and put them in a frying pan with a little bit of oil and salt, they should get soft and color a bit. Cut the tomatoes on big chunks and add them to the onions. Put a lid on and let it cook for 10 to 15 minutes, until everything is well combined. When it's done, set aside.

Clean the potatoes and peal them. Put a pan of water on the heat, and when it boils, give in the potatoes. Depending on the size, cook them for about 5 to 10 minutes, drain them and set them aside.

Preheat your oven to 180°C.

Take the cod fish out of the milk, dry it a little on kitchen paper and dip it into the flour, so it coats both sides. In a non-sticky frying pan, put a little oil and let it heat on a medium flame. When the oil is hot, put the fish in the pan and cook it for 2-3 minutes on each side to give it a golden colour.

In an oven dish, place a layer of onions cooked with the tomatoes, place the fish on top and the potatoes around it, give the rest of the onion mix on top and place it in the oven for 20 to 25 minutes.

When it comes out of the oven, sprinkle it with some coarse salt and freshly chopped parsley.

03/09/2011

Green is the Color of Hope


I'm helpless with plants, I guess I haven't been blessed with the green thumb my mum and sister have. But I do my best to improve though, I was in charge of the plants last week while my sister was on holidays, and I can proudly say that all of them survived!

We even started a little aromatic herbs garden a few month ago. In mine I chose mint, thym and rosemary. Let me tell you, my thym did not survived very long, I don't know if it was too much in the sun or if it needs more water. But the rosemary and the mint are growing, so I'm guessing they are not picky plants.


I actually have so much mint, that i'm trying to come up with new recipe, or use them in drinks like the virgin mojito. On an impulse buy I got myself some Orecchiette, because even if i like making my own pasta, I'm not good enough to shape anything else than Linguine or Tagliatelle. Sometimes it's good to make a change and I found those pretty.

So with my pretty pasta and the herbs garden, the first thing that came in mind was to make a pesto, just a different kind, because it's a mint pesto. I really enjoyed it and I hope you will too. Green being the color of hope, you can never have enough of it in your plates.

Orecchiette with Mint Pesto


Serves 1

60gr of Orecchiette
3 Tablespoons of Fresh Mint
1 Tablespoon of Fresh Basil
1 Tablespoon of Fresh Parsley
1 Tablespoon of Pine Nuts
1 Tablespoon of Parmesan, grated
2 Tablespoons of Olive Oil
1 Teaspoon of Lemon Juice
Salt, Pepper

In a non-sticky frying pan, let the pine nuts roast until they have a golden color.

I used a mortar and pestle, but you can also whizz everything together in a blender I guess, I just needed to get some frustration out ;)
So in the mortar, put the mint, basil and parsley with a bit of salt and work it until a have a green paste consistency. Add the roasted pine nuts to it and try to blend them in, before adding the olive oil.

Transfert the mixture to an other bowl and add the lemon juice and the parmesan. Season with more salt, pepper or lemon juice to your taste.

I did not use any garlic on purpose, to keep the taste more "fresh", but i'm sure it would work with it too.

Cook your orecchiette into a large pan of salted water for 12 minutes (or check what the package says), drain them and toss them into the pesto. Give it a good stir and place them on the serving plate. I like to add some freshly grated parmesan on top.