28/08/2011

Olive Focaccia


Like many people in my generation, I take all the comfort we have to help us for granted. I never even gave a lot of thoughts to it, but once my grandma told me what her daily chores used to be when she was younger: no washing machine, no kitchenaid, hell even no running water!

When I was younger, we once had a storm that brought down power lines and we had no electricity for about a day. It's only than you realise how dependant you are. Good thing my parents have a fireplace, otherwise it would have been even worse, as it was around christmas time.

Come to think of it, before the fridge was a commun appliance, imagine how complicated it must have been to store food. Most things we could preserve must have had a salty or vinegary taste to it. I wonder if they had more high blood pressure problems than we have nowadays...

Anyway, all this because I actually cleaned my fridge, which you're supposed to do twice a month... I'm pretty sure I don't do it as often, but still I did it and found a couple of opened jars of olives and I thought it was time to use them.
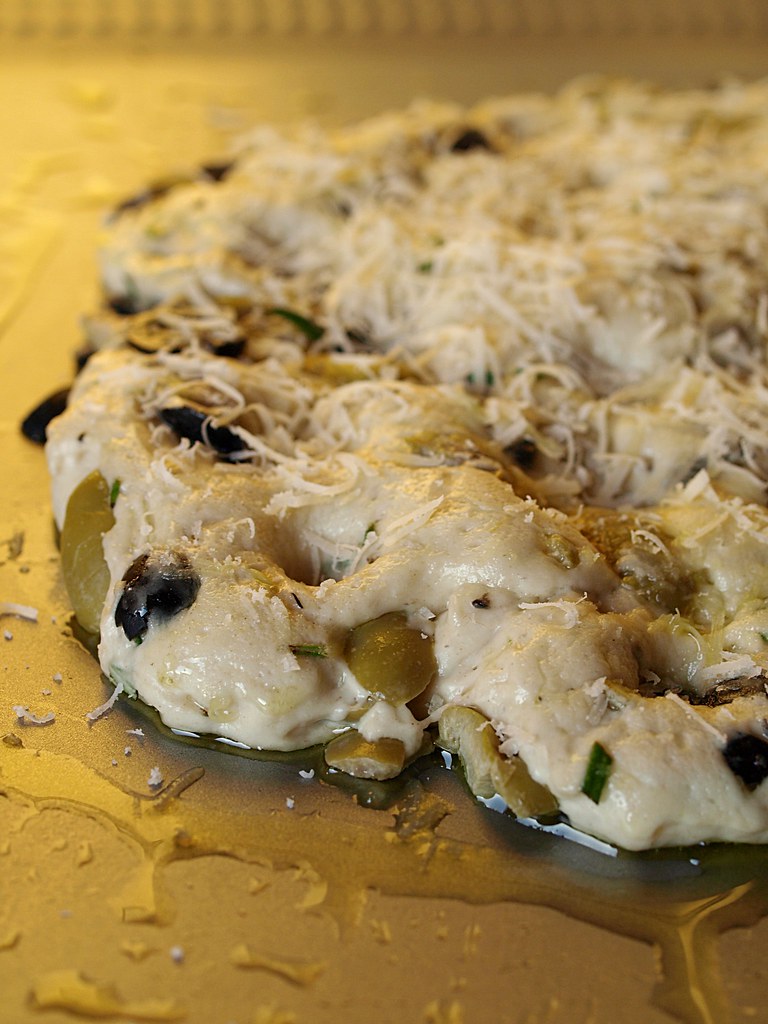
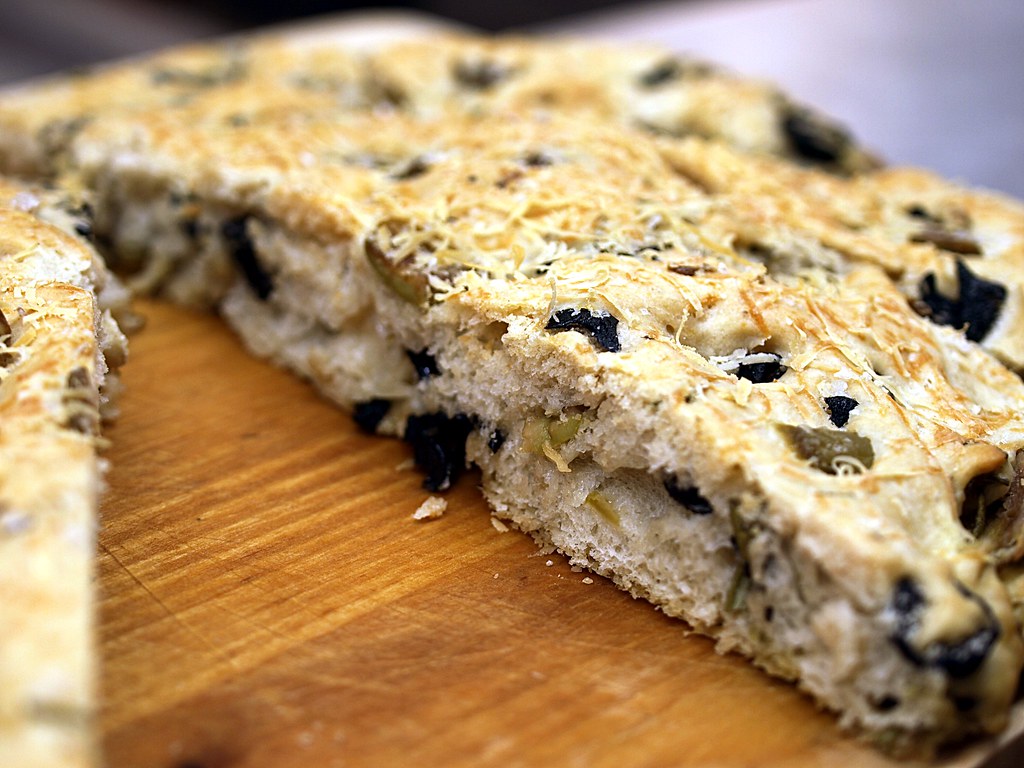
Olive Focaccia


For 1 Focaccia

About 300gr of Homemade Pizza Dough
100gr of Black Olives
100gr of Green Olives
1 Tablespoon of Fresh Rosemary, choped
2 Tablespoon of Parmesan, freshly grated
Olive Oil
Fleur de sel

Make your Pizza dough ready and let it rise under a wet clothes for an hour, an hour and a half.

Chope the olives roughly together and if needed, remove the pit.

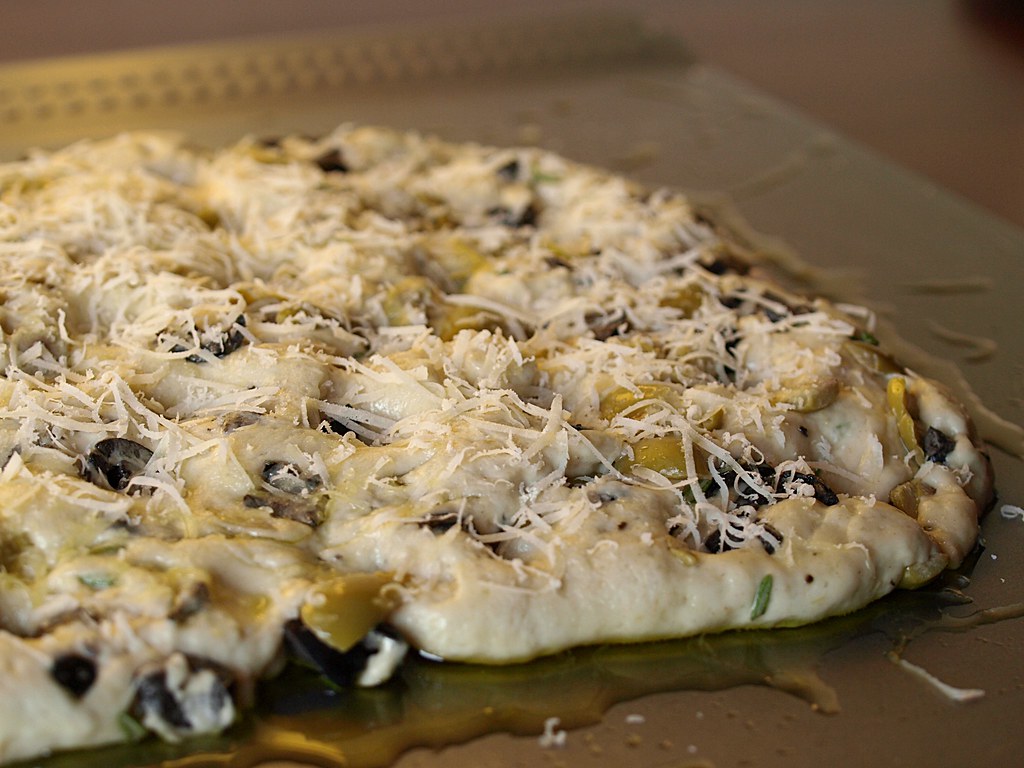
Put the pizza dough on your working surface and knead it a little before adding the olives and the fresh rosemary. Keep working the ingredients in and than using a rolling pin, roll it out to a rectangle shape, about one centimeter thick.

On the baking tray you are going to use, drizzle a bit of olive oil before placing the Focaccio on it. Drizzle a bit of olive oil on top aswell, and put a cling film on it before letting it rest for an hour in a warm place.

Preheat your oven to 220°C

Remove the cling film carefully, and using your finger tips, press down dimples into the Focaccia on the whole surface. Add an other drizzle of olive oil and sprinkle "Fleur de sel" (Kosher salt) on it aswell as the Parmesan.

Place it in the oven for about 30 minutes, it should be a nice golden color. Serve it as an appetizer cutted into small squares, or as a dish cutted in bigger chunks with a nice summer salad.

21/08/2011

Back to Nature, Blackberry Jam


I'm a geek, I've always been one. I was programming and playing on my Commodore 64 before I was ten, I got blisters on my thumbs from playing on my Super Nintendo (I think it was from the Hadouken move), and just a couple of week ago, I dismantle a laptop completly before putting it back together.

Yoda is one of my role model, I quote him at times. I laugh my ass off watching "big bang theory", thinking Sheldon Cooper is kind of cool. And as long as the TV or computer screen won't shine any UV, I'm going to keep my pasty white face thru out the year. I guess you're getting the picture ;)
So it's almost a surprise, I'm not going to talk to you about the Hi-Tech Blackberry, just the regular ones.


I grew up (and still live) in the countryside and went to pick mushroom in the forest with my parents as a child, we used to have quite a big garden and I helped picking up the tomatoes, pickles, raspberries...etc to enjoy them almost on the spot or get them to preserves.


Since, nature and I mostly meet at farmer's market. So when I spent a couple of hours last week with my mum picking blackberries, I felt younger and also more connected. It also gave me a weird sense of pride, making it literaly from scratch, even if it's a bit of work, it's worth it and cost close to nothing.

Blackberry Jam


For 6 to 7 Jars

about 2 Kilos of Blackberries
1,3 Kilos of Sugar
1 Lemon
Water

In a big pan on a medium heat, put the blackberries with about a glass of water and let them cook until it bubbles a little.

Now starts the hard part, I used a very fine sieve to pass the cooked blackberrries thru to get rid of all the seeds. It takes a while but it makes the result better.

I ended up with about 1,5 kilos of fruit that I put back into a clean pan, and added about 1,3 kilos of sugar aswell as the juice of one lemon. Bring it to the boil. 

Check if it's done using a plate you have put in the fridge before starting: put a bit of jam on the cold plate, place it back in the fridge for about 30 seconds and look if it's taken. You should be able to trace a line by runing you finger thru the jam.

Pour in clean and sterilized jars, lid on and head down. Give it the night to cool down and put in your storage.

16/08/2011

Monday should always be a muffin day


Mondays are tough to take, you have to get back into the roll, get up, go to work...etc. The whole everyday life, that gets to us every now and than. But sometimes monday can be nice, like the one this week, who happened to be a holiday here. I love it when monday is a holiday.

Not that the sun is exactly shining, though it had it's moment during the day, but you still always need extra motivation to switch on your oven during the summer. That extra motivation came into the form of Blueberries, and an urge to make some muffins.


I love doing muffins, I did a whole lot of them for my sister's wedding where I was in charge of the dessert buffet. I have stepped back a little on them since, because there's so much to try out and I don't always want to stay in my confort zone.

I love the blueberry buckle recipe, and i wanted to give that "streusel" kinda topping a try on the muffin. The blogosphere being such a wonderfull and rich place, I searched online and ended up in one of the blogs I like and toyed a little with the original recipe. Muffins are a classical, but there's a good reason for that!

Blueberry and Lime Muffins with a Streusel Topping (based on a Cake in the city recipe)


For 16 muffins

1 Plain Soy Yogurt
125ml of Rice Milk
2 Eggs
450gr of Flour
175gr of Light Demerara Sugar
2 Teaspoons of Baking Powder
1/2 a Teaspoon of Salt
110gr of Butter, cold and diced
200gr of Blueberries
Half a Lime, zested
30gr of Butter, melted
1 Teaspoon of cinnamon

Preheat your oven to 180°C. Grease your muffin tray, or line it with muffin cases.

In a smal jar, mix the yogurt with the milk and add the 2 eggs, combine gently.

Using preferably a stand mixer, combine the flour, sugar, baking powder, salt and cold butter, until it comes to a thin crumble consistency. Keep 150gr of the mixture aside.

Using a spatula, mix the dry ingredients with the wet ones as little as possible. Give in the bluberries and the lime zest. Fill your muffin cases up to about 3/4 of its height.

Add the 30gr of melted butter and the cinnamon to the dry mixture you set aside and sprinkle it on top of the muffins.

Put in your oven for 25 minutes, let it cool on a rack.

11/08/2011

Bread addicted


We all have our addictions, some more leathal than others (R.I.P Amy). My over-the-average survival instinct has kept me away from smoking, drinking alcohol and driving fast. But that doesn't mean I'm addiction free.

On top of my list you will find shooting pictures, watching all kinds of americans TV shows, listening to music, reading, the city of Lisbon. Obviously a lot of them are also related to food: chocolate, baking, cookbooks, bread...  I'm not sure where the list stops, but let's focus on those last two.


Library are places of doom for my weekly budget: novels, historical books, mysteries... and obviously cookbooks. There is always something on the shelves, making me go "Oh! I want to try this".
And now that it's so easy to order of the internet, it made it only worse. Guess who ordered a new cookbook, no later than this morning...

Making and eating bread is an other one. Now I do have mixed feeling about this one. It's my favorit to make and eat, but being white bread it's not really on the healthy side, and I like it so much that I end up eating too much of it.
Out of the oven it's so good I don't even need to spread Nutella on it to enjoy it fully, that's how much I like it.

White Bread (from "Pains de Tradition" by Marguerite Rousseau)


For 1 Loaf

10gr of Fresh Baker Yeast
20cl of Tepid Water
10cl of Soy Milk
500gr of Flour
10gr of Salt
25gr of Sugar
50gr of Butter, at room temperature

Sprinkle the fresh yeast in the tepid water to disolve it. Heat up the milk a little in the microwave.

I used my kitchenaid with the dough hook. In the bowl, put the flour and than add all the ingredients. Start slowly to combine everything and increase the speed as you go on, until it's smooth and elastic.

Dust a bit of flour on your working surface, put the bread dough on it, and fold it a few times before putting it back in the bowl. Cover it with a clean cloth and let it rise for two hours.

Butter a loaf tin. Put the bread dough again on your working surface, and work it into the shape of your tin, place it in, and cover it with a cloth again to let it rise for one more hour.

Preheat your oven to 220°C with a ceramic bowl containing water in it. Place the bread in it for about 40 minutes.

Let it cool on a rack and wait for it to be cold to slice it.

09/08/2011

Combination that works: Pear, Blue Cheese and Walnuts


I don't like eating the same dishes too often. I guess it is due to my aspargus trauma, aswell as my constant purchase of cookbooks, magazines or reading over the internet about food and recipes. That gives me way too much ideas, and there's only so much meals everyday.

I mostly just cook for myself, but buying in small portions is not always the cheapest way to go, so I often have ingredients left over. Last week when I came across this very nice salad of pears, walnuts and blue cheese, i wanted to try it out and was pleased with it.


Some ingredients just work very well together, even when you change the recipe. So with no salad left, but pears, walnuts and blue cheese in my fridge/pantry, I thought I could come up with something. Even if it's supposebly summer, the days are cold and I wanted something hot.

With the recent purchase of a book about all kind of pies and tarts, I thought I would go this way. Even if i didn't like the idea of blue cheese for a long time, I have to say I got around it and really likes how it works with the sweet taste of the pears. A match made in culinary heaven!

Pear, Blue Cheese and Walnuts Tart


For a 20cm pie dish

1 Pear
50gr of Blue Cheese (like Roquefort)
6 Walnuts
1 Egg
20cl of Soy Cream
A pinch of Nutmeg
60gr of Butter, at room temperature
125gr of Flour
3 Tablespoon of Tepid Water
Salt, Pepper

Start with the tart crust. Sieve the flour with a pinch of salt on your working surface, make a well in the middle and add the butter in small pieces to it. With the tip of your fingers, try to combine both to a crumble-like consistency.
Make a well again, to add the water, start with 2 tablespoons, and see if it needs more or not. Work it for a while, it should be smooth and shiny. Put it into cling film, and set it aside for 1 hour before using it.

Preheat your oven to 180°C.

Roll the pastry out to about a 3-4 mm thick crust, and put it in the pie dish. Prick the bottom with a fork, and put it into the oven for about 10 minutes.

Cut the pear into slices. Beat the egg and the soy cream together, add a pinch of salt, a bit of pepper and the nutmeg.

Take the tart crust carefully out of the oven, place the slices of pear on it, crumble the roquefort, or blue cheese of your choice, on top of the pear. Add the egg/soy cream over it and place the walnuts on top.

Put it in the oven for about 30 minutes. It can be served hot with a salad, or it is nice cold if you have some left over.

04/08/2011

Banana Bread


The times are tough people, when I'm brave enough to switch on the TV, the only thing they are reporting are bad news: the economical crisis, the debt, moody's rating, the unemployement... Or maybe I'm watching the wrong channel?

Not that I can complain too much, because I have a job and a roof over my head, but still, I do too have to be carefull. So when a big bag of overly ripes organic bananas are sold for nothing at the supermarkt, I felt like Nigella was looking over my shoulder, telling me to get those.

Yes, as said before, I'm a big fan of Nigella, I even named my kitchenaid after her. Though I've seen most of her TV series, at least the british ones, it's only last week that I finally got it in the mail: my first Nigella's Book, Nigella Kitchen.

She's a great food writer, I enjoyed the stories just as much as the recipe. She is a big advocate for not wasting food, and I can only applaud that, even if I don't have her fridge and freezer space. But I did freeze the bananas I didn't use this time around, as she advices to.

I did however choose the banana bread recipe from a different book, because I wanted it simple and had no cherries at hand, like the recipe in her book. But I will try it some time, just to compare of course ;)

Banana Bread (Based on "How to Cook the Perfect" by Marcus Wareing)


For 1 Bread

3 Eggs
1 Teaspoon of Vanilla Extract
1 Teaspoon of Almond Extract
300gr of Flour
1 Teaspoon of Baking Powder
1/2 Teaspoon of Salt
115gr of Butter, at room temperature
100gr of Dark Demerara Sugar
4 Bananas
75gr of Walnuts, chopped

Preheat the oven to 180°C.

Butter a loaf tin and put some baking paper in the bottom.

In a little jar, beat the eggs with the vanilla and almond extract.

Sieve the flour with the salt and the baking powder.

In a stand or hand mixer, at high speed, beat the butter with the sugar until it's well combined and light. Lower the speed and add the eggs mixture.

With a fork, mash the bananas until it turns into a creamy mixture. Add them to the sugar/eggs mixture with a plastic spatula, than add the flour in 3 times and finish with the walnuts.

Pour the batter into the tin and place it in the oven for 55 minutes. Let it cool for 15 minutes, than take it out of the tin and let it cool completly on a grid before cutting your first slice.

01/08/2011

Rösti, because today is a swiss day


Today is the swiss national day. When I was younger, I thought it was to commemorate William Tell shooting the apple of his son's head. But i's not, it's some more boring signing of paper apparently. I still like my version better, it's more festive.

I seem to have some swiss heritage, which would explain my slow way of going thru life. Switzerland is just around the corner for me, so I like to celebrate the day my own way, which obviously includes food.

Now I have already shared my favorit swiss dessert: the carrot cake, so this time let's go for something savory. Of course we all think about swiss fondue or raclette cheese, but those are not really summer dishes and my stomach is not very lactose friendly.

An other swiss classical is the Rösti (pronouce raw-ch-tee), which is a potato pancake. It can be made with raw or cooked potatoes, but as the cooked potatoes are better used the day after, and I don't always plan that far ahead, let's go for the raw version.

As it's summer, and I wanted something lighter and healthier than just potatoe, this one includes a vegetable. This is no fast food, it takes a while to get ready, but with minimal effort and ingredients for great satisfaction.

Courgette and Potato Rösti


Serves 1

1 Big Potato
1 Small Courgette
2 Tablespoons of Oil
1 Tablespoon of Chives, chopped
Coarse Salt

Peel the potato well and the courgette partly, so you have a bit of green left. Now grated them roughly, and try to have a half and half ratio.

Press them in between your hands, to try to get as much liquid out of them as possible.

In a non sticky frying pan, on a low/medium heat, put the oil in and add the potatoes and courgette. Try to combine everything well, let it cook for a few minutes.

Then try to form the pancake, by gathering everything in a round shape and pressing it down a little. Leave it for about 10 minutes, and than comes the hard part: flipping it. I use the lid of of a pan, slide the rösti on it and flip it back in the pan.

This should take about 40 minutes, just keep flipping every 10 minutes until it has a nice golden color.

Serve with freshly chopped chives and coarse salt.