30/11/2011

Like a walk in the forest, Mushrooms on a toast


My blue rubber boots, a woven basket and the smell of humus and wood: those are the memories I keep from the mushrooms hunting in the woods I did with my parents and my sister, when I was a child. It was mostly on grey saturday mornings, we wore our not so pretty outfits to face the chilly temperatures and the humidity, to walk around in the forest, looking for all kinds of mushrooms.

Coming across a Amanita muscaria when you are a child is quite an experience. As we were told, and rightly so, that they are poisonous, I couldn't help but being afraid, but at the same time it makes you really curious. And in my child's mind, it got me wondering if Alice was anywhere around, chasing after a white rabbit or listening to a caterpillar.


Black trumpets are the ones we picked the more often, but we found the occasional Wood Hedgehog or when we got really lucky, some Ceps (Porcini)! The ones we had a doubt about, we left behind or showed our local pharmacist to make sure they were edible. Enjoying them as we came back home, and drying them to have some more during the winter.

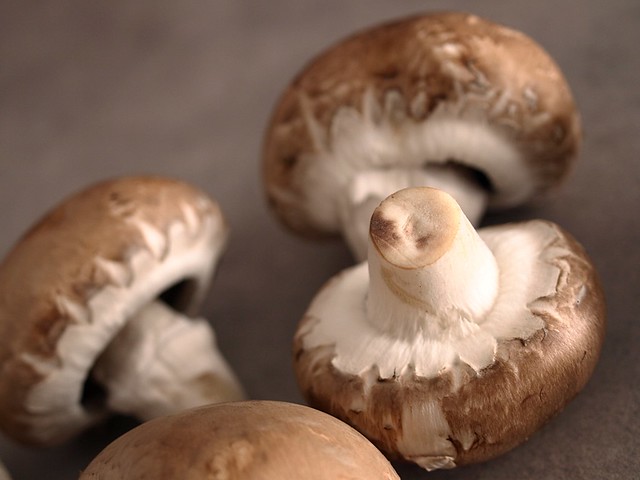
Working with mushrooms always brings back those memories, making me want to go back, even if I hadn't been in the forest in years. Those mushrooms are cultivated, but I enjoy them a lot. Obviously this recipe works with every mushroom at hand, if you're not on a budget (like me) I can only recommand you a Morel version, absolutly delicious, but oh so pricey.

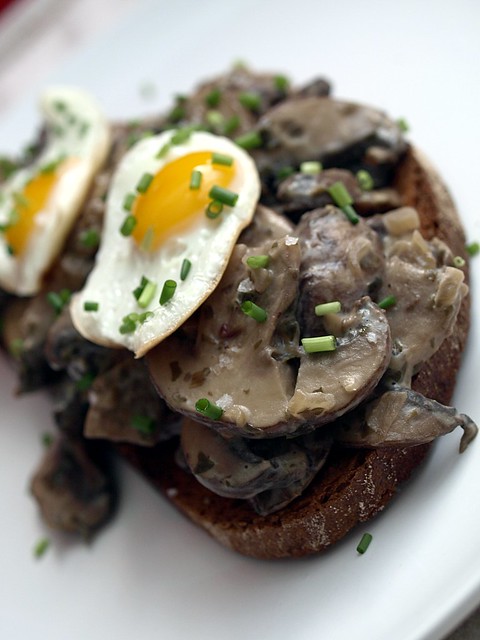
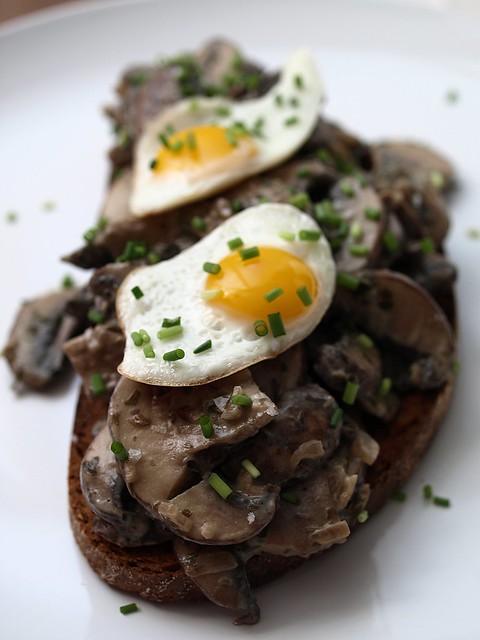
"Croûte aux champignons", Mushrooms on a toast


Serves 1

250gr of Mushrooms (brown button mushrooms here)
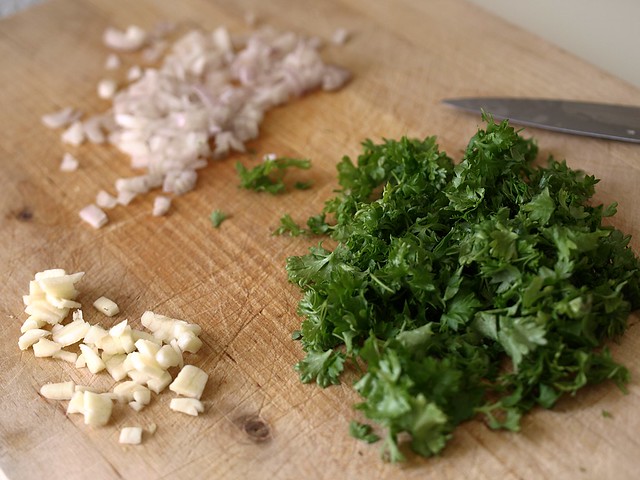
1 Shallot
2 Tablespoons of Parsley
2 Tablespoons of White Wine
2 Tablespoons of Soy Cream
Olive Oil
2 Tablespoons of Fresh Chive
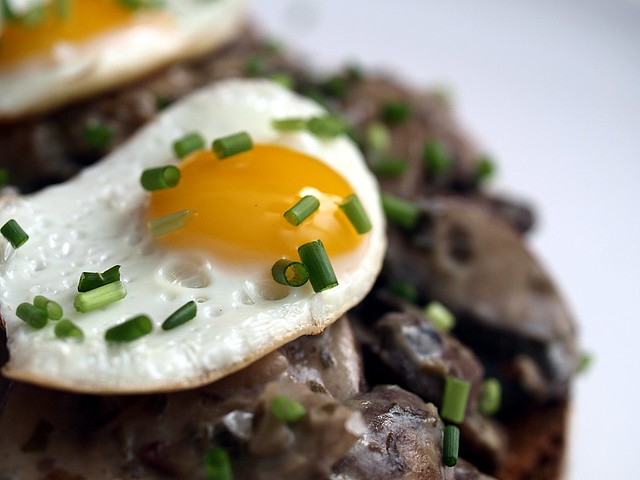
2 Quail Eggs
1 Slice of Bread
Salt, Pepper

Clean your mushrooms with a wet paper towel and cut the base of the feet off. Slice the mushrooms, about 2-3 millimeters thick.

Dice the shallot, and in a non sticky frying pan, add a bit of olive oil. Put the pan on a medium heat and add the shallot with a bit of salt and let them get a bit transparent, before adding the parsley.

Now add the slices of mushroom and let them cook for about 10 minutes, so most of their water steams out. Add the white wine at this point, and let it reduce almost completly before adding the soy cream (or regular one if you prefer). Check for seasoning, add salt and pepper to your taste, and just keep it warm.

On a slice of (preferably) whole wheat bread, drizzle a bit of olive oil. Using a toaster, or the grill of your oven, get the slice to a nice golden color.

Again, in a non sticky frying pan, that you brought to heat without any fat, cook your quail eggs, sunny side up, for about 3 minutes, try to keep the yolk a little runny.

On the service plate, place the toasted bread, add the mushrooms on it and on top, place both quail eggs. Sprinkle with fresh chives, and enjoy while it's hot!

27/11/2011

Toscany Bread, my "fast" bread


Bread making is a skill that improves with time. Thank godness for that, because my first loafs could have been used as a (deadly) weapon or replace any two by four on a construction site! But that's what being in the kitchen is also about: learning along the way and improving everytime around. In the first tries I enjoyed the preparation part more than the result, but today I can gladly say both are a pleasure.

So with some practise, but also some knowledge you learn from books, friends or cooking show, you can get a really decent result, maybe not like the pros, but close enough. The ones that I found to be handy: put a bowl of water in your oven for a nice crust, don't kill the yeast by adding water that is too hot, but mostly, work your dough, and for that part having a good standmixer can be usefull, even if the last touch has to be done by hand.


One of the bread "wisdom" I've learned, is that the longer a bread takes to rest and rise before going in the oven, the better it will keep after being cooked. The problem is, I don't always have 7 hours ahead of me to prepare bread, because I actually have a job and a life outside of my kitchen aswell (incredible, I know!).

So this is the bread I make, when I don't have as much time on my hand. It is delicious, it is best eaten within 24 hours, but after that it's still lovely slightly toasted. The dough is a bit sticky to work by hand, so having something like a kitchenaid with a dough hook, makes it much easier. It will "only" take you about 2 hours and a half for enjoying some nice fresh bread.

Toscany Bread (based on "Pains de Tradition" from Marguerite Rousseau)


For 1 Loaf

15gr Fresh Yeast
45cl of Water at 40°C
475gr Flour (Type 55) + extra for dusting
1 Teaspoon of Sugar
10gr of Salt
100gr of Whole Wheat Flour

In the bowl of the Kitchenaid, crumble the yeast and add 5cl of water to disolve it in. Let it sit for 15 minutes.

After that, add the rest of the water, the 55 flour, the sugar and salt. Start slowly to combine and increase the speed as you go, aswell as adding the whole wheat flour. Work the dough for at least 5 minutes, it will still be pretty sticky, but elastic.

Dust the dough with flour, bring into the shape of a ball, cover it with a clean cloth and let it rise for 45 minutes in a hot place (around 25°C, I place mine close to the radiator).

Preheat your Oven to 200°C and place an oven proof recipient with water in it.

On a very well dusted worksurface, tip the dough and dust it generously with flour, stretch it and fold it a few times, add some more flour if needed. Shape it into a loaf and place it on a dusted oven tray.

Cut into the loaf with a sharp knife a few times on the top, and brush it with tepid water before putting it in the oven for 1 hour. Let it cool on a rack before enjoying it.

24/11/2011

The Swiss Chard Season


As mentionned before, quite a few times actually, I'm very much trying to follow the seasons when it comes to fruits and vegetables. Not only do they taste better, they are cheaper and they didn't travel half the world to make it to my plate. Plus nature is smart, smarter than us sometimes, and the vegetables in season bring you what you need at that time of the year.

Like everytime I want to learn something new, I turn to books. Some of the ones I own, like "les cakes de sophie" classify the recipes by month, which is nice to have ideas from, one season to an other. But I also purchased some new ones, the one I like best on that subject is "L'almanach gourmand des 4 saisons", which combines recipes, articles, ingredients list and ideas.

But going to the supermarket with my book, isn't really a handy thing to do. So I was really thrilled when I learned about local farmers that make a weekly basket of vegetables. You can choose the size of your basket, and you get every week vegetables that are in season, different ones depending on their production. It's local and fresh, but also gives me the opportunity to cook vegetables I maybe wouldn't have bought for myself.


Like last weeks swiss chard, which was a first for me. The green part can be used as spinach, it's quite similar, with a bit more crunch and an earthiness to it, I add some to a pie I've made. The white stem need more time to be cooked, but work greatly in a gratin. I'm not a big fan of bechamel, so this is just a light soy version of it, it's for the texture, the flavour comes from the vegetables and herbs.

Swiss Chard Gratin


Serves 2

1 Swiss Chard, the stems
1 Shallot
2 Cloves of Garlic
2 Tablespoons of Parsley
Butter or Olive Oil
250ml of Soy Milk
1 Tablespoon of Cornstarch
Grated Parmesan
Salt, Pepper

Clean the stems and cut them into pieces of about 2 cm. In a pan, heat up water with some salt, when it boils, add the chard stems and cook for 8 minutes. Drain them and set aside.

Chop the parsley, mince the shallot and the garlic. Heat up a bit of butter or olive oil in a pan, add the shallot and the garlic, aswell as a bit of salt, cook slowly. Add the swiss chard and the parsley and cook for a few more minutes. Taste to check the seasoning, add salt and pepper to your taste. Set aside.

Preheat your oven to 160°C

In a sauce pan, pour in the soy milk and the cornstach, and on a medium heat, whisk until it reach the right consistency. This will take a few minutes.

Combine your light bechamel with the chard stems, place the mixture in a gratin dish, and grate parmesan on top. Place it in the oven for about 15 minutes, the parmesan should get a nice golden color.

20/11/2011

Eton Mess: my Autumn version


I'm reading Jane Austen's "Sense and sensibilty" at the moment, which I'm enjoying a lot. Beside the lovely scenary, the historical insight, it goes to prove, that not matter which century we are in, girls will always be girls. Passionate like Marianne, reasonnable like Elinor or a optimistic like Mrs Dashwood, she portrays the characters beautifully and I'm looking forward to read some more.

This book, somehow, got me in a british mood. 15 years of american TV shows and movies, brought me to find the british accent more "exotic" than the american one. For instance, Nigella's accent and vocabulary (beside other things) are such a delight to listen to, I also have a soft spot for the scottish accent, go figure ;)

Though I'm a big tennis fan, I never made it to Wimbledon, yet. The tournament, the history, the traditions, it seems like something that needs to done at least once. Apparently drinking Pimm's and eating strawberries and cream is also part of the whole decorum. I'm not sure about the alcoholic drink, but I'm all for the strawberries.

Which brings me to the Eton Mess, a tradtional dessert served during the annual cricket game at Eton's college. Does it get any more british than this? I don't think so! Well strawberries are not in season anymore, and my stomach (and hips) do not always agree well with whipped cream, so this is just my own take on it. Cheers!

Apple and Pear Eton Mess


Serves 2

1 Apple (Braeburn)
1 Pear (Conference)
1 greek yogurt
20gr of Butter
1 Teaspoon of Cinnamon
1 Teaspoon of 4 Spicies
1 Tablespoon of Dried Raisins
1 Tablespoon of Muscovado Sugar
1 Tablespoon of Walnuts
4 or 5 Small Meringues
Golden Syrup

I had some meringue batter left from my Lemon Pie, so on a oven tray lined with a baking sheet, using a piping bag, press the meringue out to the shape of a nest, about 2 to 3 cm diameter. In an preheated oven at 150°C, place the tray, and let the meringue cook for about 45 minutes, they should "dry out" more than cook, check the bottom to see if they are done. Let them cool on a rack.
You can obviously skip this step if you prefer, and buy meringue in the shop.

Core the apple and pear, cut them into quarters and chop them roughly, I left the skin on, but you can remove it if you prefer.
In a pan, on a low heat, give in the butter and let it melt a little before adding the apple, pear and dried raisins. Sprinkle the sugar over the fruits to caramelize them a little. Add the spicies and let it cook for a few minutes, until the fruits have a nice brown color, are cooked, but still have a bit of crunch. Let it cool on the side.

Put the meringues in a plastic bag, like a freezing bag, and let your anger out on it! Using a rolling pin, a spoon or your fist, crush the meringue. But don't make only powder out of it, you want to have some bigger bits left.
Whipp the greek yogurt in a bowl and add the meringue to it, you can keep a little meringue to put on top in the end.

In the service dish, put the yogurt and meringue first, add the fruits on top, you can sprinkle some walnuts and crush meringue on top,  before adding a bit of golden syrup to serve.

18/11/2011

"1 a minute" for healthy eating: Indian Bulgur


All over the world, a woman is diagnosed with breast cancer every 69 seconds.

"1 a Minute" is the title of a film I would recommend all of you to see. It chronicles the diagnoses of breast cancer and the treatment women are going thru. It's also a documentary, with some famous people telling their own story and experience, their fight and how they survived cancer, like Melissa Etheridge or Olivia Newton-John.

October was the month of breast cancer awareness. But there shouldn't be just a month out of the year, it should be so all year long. Even if the risks is increasing with age, it can happen anytime, so please: Check Yourself.
This topic is very personal, my mum is a cancer surviver, she has been diagnosed with cancer at the age of 38, and almost 15 years later, she is healthy and the happy grand'ma of 3 lovely monsters.


The link between food and health is a topic that gets more and more attention today, with special anti-cancer diet and ingredients that are adviced, in numerous books. One of those ingredients, that has antioxydant properties, is turmeric (Curcuma), which happens to be a spice I like, especially for the bright color it brings to every dish you use it in.


Cereals, mostly wholegrains, should also be a part of your daily diet, they are a source of fibres, vitamines, minerals... And it's also proved to reduce the risk of coronary diseases, diabetes and cancer, mostly colon and stomach, but also breast cancer.
Now with the variety of cereals out there, we have a lot of choice to make our menus with: couscous, brown rice, oatmeal... I choose Bulgur for this recipe because I like the "crunch" of it, even after it's cooked.

Indian Bulgur


Serves 2 or 3

250gr of Bulgur
1 Onion
3 Tablespoons of Dried Raisin
2 Tablespoons of Cashew Nuts
2 Teaspoons of Turmeric Powder
2 Teaspoons of Curry Powder
Olive Oil
Salt

Put the dried raisin in a cup, and cover them boiling water for about 15 to 20 minutes.

Slice the onion in half-moons and in a big non sticking frying pan with a bit of olive oil, cook the onions slowly to get them transluscent. Give in the cashew nuts to roast them a little, than add the turmeric and curry.
Drain the raisins and add them to the onions, stir for a while and add about 3 tablespoons of water, and let it simmer on a low flame.

In a pan, heat up the same volume of water as the volume of bulgur you have, add some salt to the water. When the water is boiling, add the bulgur, lower the flame and let it cook for 8 minutes. It should absorb most of the water.

When the 8 minutes are over, add the bulgur to the onions and spices mixture, combine everything well together, and stir for about 4 to 5 minutes, so there is no water left. Taste and season with salt if needed.
I like it as a dish, but it goes well with white meat, such as chicken.

13/11/2011

The Wisdom of a Lemon Pie


As said before, I hope that with the years going by, if nothing else, we get to be a little bit wiser along the way. Like in the kitchen, sometimes while reading a recipe, you know that's not the result you want to have, that this way of cooking this or that ingredient will give you a different result. A steamed potato is not a roasted one!

I choose to make a lemon pie for this week end, after browsing thru one of my baking book, the picture got my intention. But than reading the recipe, with a crust that was baked with the cream inside, it just didn't sound right to me... I like my crust to be crunchy.

So I turned to one of my favorit website when it comes to food, the one from chef simon, who is a blogger but mostly a teacher, and that's exactly what his website is about: teaching. From the easiest step to the more advanced one, everything is explained and pictured. And the fact that is a fan of Rock music, brings him bonus points in my opinion.

This is obviously not my first lemon pie, I've tried different ways to come to my favorit combination: a crust with ground almonds, a lemon cream that you cook on the stove, close to a lemon curd and a french meringue on top. Like every classical recipe, there are so many version, that you have got to choose your own way to do it, I guess that's also a part of wisdom.

Lemon Pie


For one big pie and 4 little ones

For the crust:
200gr of Flour
150gr of Butter
50gr of Icing Sugar
50gr of Ground Almond
1 Egg
Salt

For the Lemon Cream:
80gr of Butter
25cl of Lemon Juice
25cl of Water
3 Eggs + 3 Egg Yolks
200gr of Sugar
50gr of Corn Starch

For the Meringue:
4 Egg Whites
200gr of Sugar
Salt

Let's start with the crust, in your standmixer give in the butter and, at a slow speed, soften it before giving in the sugar and ground almond. When well combined add the egg, mix again, and than add the flour and a pinch of salt. Always at a slow speed, give a few turns, but don't over work it, it should almost be like a crumble. Bring it into a ball with your hand, and let it rest in the fridge for about 30 minutes.

Preheat your oven to 180°C.

Roll out your pie crust on a floured surface, to about 3 or 4 millimeters thick. Place it into your pie dish, carefully press it down around the rim and cut the extra pie crust of. Get it back to the fridge for about 15 minutes.
Cut a baking sheet to the size of your pie dish and lay it on the crust, add some weight (like dried beans) on it to put it in the oven for about 10 minutes. Check the border of the pie, when they start to have a golden color, take the pie out of the oven, remove the backing sheet and the beans, and place it back into the oven for an other 10 minutes, or until it's a nice golden color. Leave it to cool.

Now to the cream: in a big sauce pan, give in all the ingredients and place it on a medium flame. It takes a lot of stiring to come to a nice creamy result, but it's all it takes. Count about 10 minutes of non stop stiring, when it reached the wished consistency, step aside to cool.

Fill your pie crust with the lemon cream. Start with the meringue, put the egg white in the mixer with a pinch of salt. Increase the speed of the mixer as you go and when they are close to a soft peak, add the sugar slowly and increase the speed again until they are shiny and with firm peaks.

Preheat your oven to 170°C.

Using a piping bag or just with a spoon, top your pie with the meringue, and put it in the oven for 10 more minutes, if it doesn't color enough for your taste, use the grill of your oven in the end, but stay close, it changes very fast. Serve it when it's cooled down.

11/11/2011

Carpe Diem, Gnocchi with Green Olives


As a young teenager, one of my favorit movie was "Dead Poets Society". I've seen it at least a dozen time, and it never failed to make me cry. It's the movie, amongst other things, that made me want to be a teacher. I watched that movie again yesterday evening, for the first time in years, and it didn't fail to make me cry, again.

Even 15 years later, with more life experience and hopefully more wisdom, I still got to be really moved by the story. Showing the importance of passion, commitment, anticonformism or gratitude in life. How seizing the day or even the moment is something important, that we might not be doing enough.

Look out on the streets and in the shops, we are early november, and everybody is already high on christmas, and when that is done, we will most likely have easter stuff coming our way. Don't get me wrong, I do too like to have things to look ahead to, but if we constantly care about what's coming next, are we actually enjoying the moment that is happening right now?

When I cook or bake, I am looking forward for the result, but also every step of the way: cleaning, cutting, roasting, mixing, seasoning... Gnocchi are not difficult to make, it takes a bit of time, but for a nice result, where you know exactly what you are going to eat. I've decided to make mine with green olives, and may the italian forgive me, I didn't use hot butter to serve, but drizzled them with olive oil. Than I sat down, and enjoyed every bite of it.

Gnochhi with Green Olives (Based on "Bryn's Kitchen")


Serves 1 as a dish, or 2 as a side dish

4 Regular Potatoes (to have about 200gr of mashed potato)
2 Egg Yolks
60gr of Flour, plus extra for dusting
25gr of Parmesan, plus extra to serve
2 Tablespoons of Green Olives, pitted
A pinch of Salt
Rock Salt
Olive Oil

Preheat your oven to 160°C.

In an roasting dish, make a layer with the rock salt and place the washed but unpeeled potatoes on it. Place it in the oven for 1 hour and a half, but check after an hour with a knife to see if the potatoes are baked.

When the potatoes are done, cut them in half and scrap the potato flesh out, place it in a bowl and mash well with a fork.


Add the egg yolks, the flour, the parmesan, salt and the green olives that you have chopped finely. Combine everything to make it come together as a dough.

When the dough is ready, separate it in two, and on a well floured work surface, roll it out into a sausage shape, about 1 cm diameter. Now cut your gnocchi, about 2 cm long, press down a fork on them to leave little stripes.

Bring a large pan of salted water to the boil, and carefull drop the gnocchi into it. It's easy to know when they are done, because they start floating on the surface.

Take them out of the water and serve on a plate, drizzle some good olive oil on top and grate some parmesan before serving.

06/11/2011

Marzipan Cake: I want to marry Nigella!


I've been watching her TV shows for years, and everytime it's such a delight, almost a guilty pleasure, like her visits to the fridge in the middle of the night. Between the rich and luscious recipes, her lovely british accent and her naughty school teacher look (yes, we all have our weak spots), no wonder she is the queen of food porn!

Now on a daily basis, I don't think I could eat Nigella's recipe without gaining quite a few extra kilos. There is no place for low fat crap or doing things half-way in her kitchen, and I admire her for that, in a time where everybody (including me) wants to be "healthy". Her cooking is about pleasure and that's exactly what she delivers.

So when I saw this recipe on her website, with all the marzipan left from my niece and nephew's birthday cakes, I knew this was the way to go. The ingredients would make any nutrionist frown: a lot of butter (arteries blocking), sugar and marzipan (diabete risk), 6 eggs (cholesterol). But can we really care about all those things on a sunday? I don't think so!

So for the first time I "blitzed" a cake, in my best Nigella fashion. I'm not used to bake with the help of my food processor, but I have to say it's quite handy, I might renew that experience sooner rather than later. And the cake itself? Well, if worth all the extra exercice that I will have to do.... Tomorow ;)

Marzipan Cake (From Nigella.com)


250gr of Butter
250gr of Marzipan
150gr of Sugar
1/2 Teaspoon of Almond Essence
1 Teaspoon of Vanilla Extract
6 Eggs
150gr of Flour
1 Tablespoon of Baking Powder

Preheat the oven to 170°C.

In a food processor, give in the cubes of marzipan, the butter cut down in pieces and the sugar. Blitz everything together. Add the almond and vanilla to it. Try to make something homogenous.

Down the funnel, give in one egg after the other and finish with the flour mixed with the baking powder, combine well.

In a round cake tin, buttered and floured, give in the batter, and in the oven it goes, for about 50 minutes. Check with a wooden skewer if the cake is done. Let it cool in the tin before taking it out to serve.

03/11/2011

The colors of autumn


I'm lucky enough to live in a region where we actually still have 4 seasons. Even if sometimes it feels like we are jumping from summer to winter in a couple of days, mostly we can enjoy the changes thru the year. I could hardly pick a favorit time of year, because they all have something special that makes them different from the previous or the next one.

In autumn, I love all the colors nature is giving us. The bright yellows, sunny oranges or vibrant reds are a good way to chear us up from the days getting shorter. Even in our plates the seasonal fruits and vegetables are colorfull, I guess it's to compensate the lack of sun outside.


Even if confort food mostly includes something rich and consistent, I personnaly don't want to get to spring with a few more kilos on my hips (or anywhere else, for that matter!). So a warm soup is a nice, lighter way to get some comfort on a cold day.

The good thing with soup, is that there is no need to follow an exact recipe, you can take the vegetables that you think will go well together, you can use more or less water depending on the consistency you enjoy, aswell as some spicies, to give it a personal touch. And if you ask me, like any good dish, it's even better when you heat it up again.

Squash and Yellow Carrot Soup


Serves 2

300gr of Squash
300gr of Yellows Carrot
3 Potatoes
1 Onion
4 Cloves
4 Bay Leaves
1 Stick of Rosemary
1 Teaspoon of Curry
1 Teaspoon of Turmeric
1 Teaspoon of Nutmeg
Salt, Pepper

Take the seeds out of the squash and cut the skin of, cut it into chunks. Peel the carrots and potatoes and cut them into smaller pieces than the squash, because they will take longer to cook.

Peel the onion and insert the cloves into it. Tie up the bay leaves with the rosemary stick, so you be able to pick it out easily.


In a big pan, put in all the vegetables, cover them with water and add the onion aswell as the bay leaves with rosemary. On a medium flame, let it cook for about an hour, until the vegetables are done, check with the tip of a knife to see if they are soft.

Using a skimmer, remove the onion and the bay leaves with the rosemary and take out the vegetables to an other pan, add a bit of the water of the vegetables, and using a hand mixer, start blending. Add some more of the water if you want, until it reaches the wished consistency.

Add the spicies, salt and pepper to taste and check for seasonning. You can add some croutons on top and sprinkle fresh parsley to serve.