27/04/2012

Daring Baker - April 2012 Challenge


This is a new kind of post, which should hopefully appear every month on this very same date. I've joined the online community of the Daring Bakers, as a way to discover new recipes and try something different.

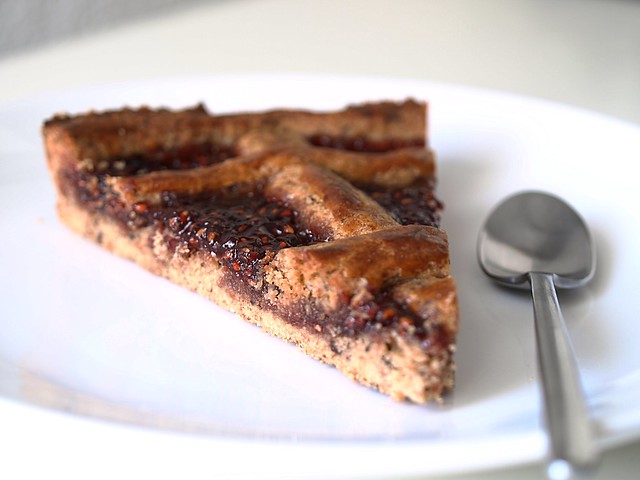
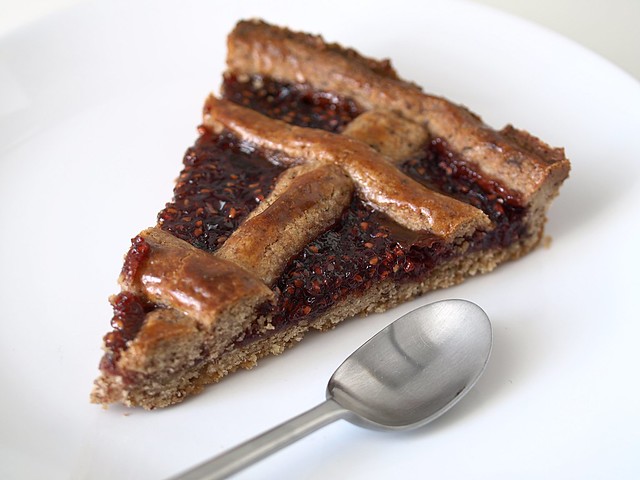
The Daring Bakers’ April 2012 challenge, hosted by Jason at Daily Candor, were two Armenian standards: nazook and nutmeg cake. Nazook is a layered yeasted dough pastry with a sweet filling, and nutmeg cake is a fragrant, nutty coffee-style cake.

Both have been great surprises, with a slight preference for the nazook. I had never baked anything armenian before, to my knowledge at least, and I'm keeping both in my recipe book.

Nazook


For about 40 pieces

Pastry dough
420 gr all-purpose (plain) flour, sifted
2½ teaspoons active dry yeast
240 ml sour cream
225 gr softened butter (room temperature)

Filling
210 gm all-purpose (plain) flour, sifted
340 gr sugar
170 gr softened butter (room temperature)
2 teaspoons of vanilla extract

Wash
1-2 egg yolks

Make the Pastry Dough
1. Place the sifted flour into a large bowl.
2. Add the dry yeast, and mix it in.
3. Add the sour cream, and the softened butter.
4. Use your hands, or a standing mixer with a paddle attachment, to work it into a dough.
5. If using a standing mixer, switch to a dough hook. If making manually, continue to knead for about 10 minutes, or until the dough no longer sticks to the bowl or your hands. If it remains very sticky, add some flour, a little at a time.
6. Cover the dough and refrigerate for 3-5 hours, or overnight if you like.
Make the filling
7. Mix the flour, sugar, and the softened butter in a medium bowl.
8. Add the vanilla extract.
9. Mix the filling until it looks like clumpy, damp sand. It should not take long. Set aside.
Make the nazook
10. Preheat the oven to moderate 175°C.
11. Cut the refrigerated dough into quarters.
12. Form one of the quarters into a ball. Dust your working surface with a little flour.
13. Roll out the dough into a large rectangle or oval. The dough should be thin, but not
transparent.
14. Spread 1/4 of the filling mixture across the rolled-out dough in an even layer. Try to spread the filling as close as possible to the edges on the short sides, but keep some of pastry dough uncovered (2.5 cm) along the long edges.
15. From one of the long sides, start slowly rolling the dough across. Be careful to make sure the filling stays evenly distributed. Roll all the way across until you have a long, thin loaf.
16. Pat down the loaf with your palm and fingers so that it flattens out a bit (just a bit).
17. Apply your egg yolk wash with a pastry brush.
18. Use your crinkle cutter (or knife) to cut the loaf into 10 equally-sized pieces. Put onto an ungreased cookie sheet.
19. Place in a preheated moderate oven for about 30 minutes, until the tops are a rich, golden brown.
20. Allow to cool and enjoy!

Armenian Nutmeg Cake


For 1 cake

240 ml milk
1 teaspoon of baking soda
280 gr all-purpose (plain) flour
2 teaspoons baking powder
400 gr brown sugar, firmly packed
170 gr butter, preferably unsalted, cubed
55 gr walnut pieces, may need a little more
1 to 1-1/2 teaspoons ground nutmeg
1 egg

1. Preheat your oven to moderate 175°C.
2. Mix the baking soda (not baking powder) into the milk. Set aside.
3. Put the flour, baking powder, and the brown sugar into your food processor. Pulse until uniformly mixed.
4. Toss in the cubed butter. Pulse until uniformly mixed into tan-colored crumbs.
5. Pour HALF of the crumbs into your springform (9”/23cm) pan. Press out a crust using your fingers and knuckles.
6. Crack the egg into the food processor with the rest of the crumbs still in it.
7. Grate 1 to 1-1/2 teaspoon of nutmeg. Toss that into the food processor, too. Pulse until well-incorporated.
8. Pour in the milk and baking soda mixture. Continue to mix until a slightly lumpy tan batter is formed.
9. Pour the batter over the crust in the springform pan.
10. Gently sprinkle the walnut pieces over the batter.
11. Bake in a preheated moderate oven for 55 minutes. It's ready when the top is golden brown, and when it passes the toothpick test (comes out clean).
12. Cool the cake in the pan, and then dig in.

23/04/2012

Mango and Vanilla Jam


I think some people should look for their inner child more often, it would make everyday life much more fun. My inner child is alive and kicking, I actually have to be carefull not let it take over. Because playing hide and seek in the supermarket, stops being cute when you're not a toddler anymore or using an IKEA shopping cart like a kick scooter, to race thru the aisle can be dangerous (believe me...).

Grown up life is full of advantages, but has it's share of duties aswell. I try to keep them to a minimum, but certain things just need to be done. Like filling your tax forms (just got mine today...), go to some doctors appointment or mop the floor every now and then.
At least as a child, when you did a chore, you got a reward from your parents or a teacher. But as a grown up nobody congratulates you for doing the dishes anymore or the dentist does not give you a lollypop anymore, ahhhh the injustice.

That's why sometimes, I reward myself when I did something I just had to do, though I didn't wanted. A few weeks ago, I had one of those doctor's appointment, that I went to because my mum wants me to (and I can't say no to her).
So when I was finished with it, while doing my errands, I stumbled upon a nice copper pan to make jam and decided that I've deserved it. Plus with all the jam I'm making thru the year, it's really more of an investement (yes, I'm good at convincing myself).

And for a new utensil, I thought a new recipe would be nice. I've never done jam with exotic fruits so far, I tend to do it with the fruits that are abundant around here (prunes, blackberry, cherry...). Mango was my choice of the day with a bit of vanilla.
I like the result just like this, where you can really taste the fruit. But I think it would go well with pineapple aswell, or maybe replace the vanilla with some ginger, to give it more "zing" as Nigella would say.

Mango and Vanilla Jam


4 Mangos (which made 1,2kg of flesh)
800gr Sugar
1 Vanilla Pod
1 Lemon

Peel, remove the pit and cut the mangos into cubes. Place them into a bowl with the sugar, the lemon zest and juice, mix with a spatula so the sugar is everywhere. Leave it like this for at least 2 hours.

After that rest, you should have some juice from the fruit that combines with the sugar on the bottom of the bowl. As I didn't want to have too big chunks in the jam, I used a plunging mixer to make it into smaller pieces, but not a soup either.

Pour the mixed mangos into a big pan, cut the vanilla pod into half, scrape out the seeds and add them to the mixture aswell as the pod itself.

On a medium to high heat, cook the jam for about 20 minutes, stir often. Place a plate in the fridge when you start cooking it, and check if it's done by placing some jam on the cold plate, when you tilt it, it should not be too runny.

When cooked, pour immediatly into glass jars that you have boiled, place the lid on and leave them to cool upside down.

19/04/2012

Let's get Nuts!


From the movies I've seen, Indians used to have a dance for the rain. Now maybe this is just some Hollywood folklore, or it might be true, but I'm wondering, do they have a dance for the sun aswell? Because if they do, I'm willing to give it a try.
I know rain is a good thing, specially because it didn't rain or snowed much this year during the winter, so I'm happy for our farmers aswell as for the water table. But the seasons feel a bit mess up, and that's what I'm complaining about!

So instead of trying to make the sun appear with some dancing (let's face it, my dancing skills would only bring ridicule), I'm trying it with some food instead, maybe if I make a sunny day dish, the sun will appear. And believe it or not, the only ray of sunshine today was when I was preparing this.
On sunny days I like to eat salads, all kinds of them. And the one combination I'm enjoying a lot these days is radish with avocado, both have a light nutty flavour but in a completly different way. Avocado brings a smooth and round taste to the salad, where the radish makes it sharp.

I actually didn't like radish as a kid, I thought the taste was too strong. But as with the beetroot lately, I've given it an other try. And that strong taste can bring, in little touches, a nice complement to a dish. To make this salad completly "nut" I though walnuts would be a nice addition.
As for the roquefort, it's actually inspired by Nigella (the real one, not my kitchenaid) because I saw her doing a roquefort guacamole once on her show, so I know the combination would work. Now come on sun, show yourself!

Avocado and Radish Salad


Serves 1

1 Avocado
4 Small Radishes
6-8 Walnuts, chopped
50gr of Roquefort
1 Tablespoon of Walnut Oil
1/2 a Tablespoon of Lemon Juice
Coarse Salt

Cut the avocado in halfs, take the pit out and remove the flesh. Cut the flesh into cubes and place them into a bowl, add the lemon juice, this will prevent the avocado from turning black and will replace the vinegar.

Clean the radishes and slice them thinly. Add them to the bowl with the chopped walnuts. Break the roquefort into small pieces, add them aswell to the bowl and using your hand, gently, mix the ingredients.

Pour the walnut oil on top of the salad, mix a little more. Sprinkle with some coarse salt, and eat preferably under the sun on a balcony, but in the inside will do too.

12/04/2012

A little bit of inspiration


I would have loved to be more of an artist, have some talent in drawing for instance, because as it is now, I'm hardly better than my nieces and nephew when we play pictionnary. Or be a musician, not that I can't play a few chords on my guitar, but my lack of sense of rythm (and also of practising) keeps me a mediocre player.

Even if I hope I'm a little more skilled when it comes to photography, it's mostly because there is a "geek" side to it: setting the shutter speed, the aperture, the ISO, the white balance... All things technical, that can be understood quite easily if you are a little curious. It will help to set your camera to have the result you wish.

But beside everything technical, even in photography there is something else needed to make a great picture. And sometimes even a blurry, too dark picture brings more emotions to you, than a perfect landscape would. Because of the story that you imagine behind it, because of the feelings it creates or because it simply inspires you.


I'm not there yet, my everyday pictures mostly don't tell a story. And maybe that's what I like about food photography, it's just about making you hungry! Today's dish photographies might not quite achieve that, but don't knock it till you've tried it.

This recipe is about inspiration in the kitchen, or my way of cooking sometimes: opening the fridge and coming up with a recipe with whatever is in it. Sometimes it's not worth mentionning (or even eating for that matter) but sometimes it turns out to be really good, like this one.

Codfish Parmentier with a Pesto Crust


Serves 2

3 Big Potatoes
2 Tablespoon of Cream
1 Teaspoon of Thym
300gr of Codfish (fresh or salted)
1/2 a Liter milk
2 Bay Leaves
4 Tablespoons of Pesto (here I used a watercress pesto)
4 Tablespoons of Breadcrumbs
Salt, Pepper

Let's start with the purée, clean and peel the potatoes. Cut them into 2 or 4 pieces, place them in salted water, bring it to the boil and cook it for about 20 minutes, but it really depends on the size of your potatoes, check with a knife to see if they are cooked.
When cooked, drain the water, and with a potato masher (or a fork) mash your potatoes with the cream. Add the thym, salt and pepper and check the seasoning. Set aside.

Now to the fish, if you have fresh codfish, you can place it in a pan with milk and the bay leaves. If salted, you'll have to leave if in the water at least overnight, and change the water a few times, than only can you cook it in milk. This will only take a few minutes, on a medium flame, cook the fish for 5 to 6 minutes.
Drain the milk, leave the fish to cool a little, than break it into little pieces, if needed remove the skin and the fish bones. Set aside.

Preheat the oven to 170°C.

In a bowl, combine the pesto with the breadcrumbs, one spoon at a time, it should feel like a crumble, so the quantity depends on how much oil is in the pesto. Set aside.

In an oven dish, make a first layer with your potato mash, lay your fish evenly on it and sprinkle the pesto crumble on top. Place in the oven for 30 minutes.

06/04/2012

When you need comfort...


Things don't always turn out the way we expect them to, do they? For instance, as a child, between many other things, I wanted to grow up to be Indiana Jones. Well, let me tell you, even if sometimes I do wear a hat, I still have no skills with that kind of whip (though, thinking about it, I'm not too bad with a kitchen whip) and I don't get chased by giant boulders on a daily basis.
So when my holidays plans got cancelled due a strike, dissapointment was in order. Anything keeping me away from my favorit city and a great concert can hardly be seen as positiv. But nevertheless, I was, and still am, on holidays. So I'm trying to make the best out of it.

As much as I try to make things out of the ordinary, in order to feel like I'm actually on holidays, when I got to my kitchen and kitchen books, I suddenly had a craving for something very familiar: the linzertorte.
I guess we can say it's some sort of jam tart, very traditional from around here. But I've recently seen an italian dessert that looked a bit similar, so I'm guessing many countries have their own version of it.
A version of the recipe has been published in a recent number of Saveurs magazine, but once again I've taken Betty Bossi's recipe, because unlike air traffic controllers, she has never failed me.

Linzer Torte ( based on "Betty Bossi Back Buch")


For 1 Tart

250gr of Butter, at room temperature
200gr of Sugar
3 Eggs
200gr of Almonds, grounded
50gr of Chocolate, gratted
1/2 a Lemon, zested
1 Teaspoon of Kirsch (Cherry Liquor)
1/2 a Teaspoon Cinnamon
1/2 a Teaspoon Cloves, grounded
1/2 a Teaspoon of 4 spicies 
1/2 a Teaspoon Salt
200gr of Flour + 3 Tablespoons
200gr of Raspberry Jam

Whisk the butter and the sugar together until it's white and creamy, than add 2 eggs, the almonds, the grated chocolate, the lemon zest, the Kirsch, and the all the spicies. Combine well.
Add gradually the flour, until you have a dough. Take 3/4 of the dough and roll it out to place it in a tart or pie dish that you have buttered.

Preheat the oven to 200°C.

Fill the pie up with the raspberry jam. Take the rest of the dough and add 3 tablespoons of flour, combine well and roll out to cut out the stripes that will cover the pie. You'll need about 10 stripes, 5 for each way, about 1cm thick.
Place them in a checkered pattern on the jam. Use the remaining egg to make an egg wash, and brush the dough with it. Place it in the oven for about 45 minutes.

01/04/2012

April is here, don't be a fool!


Flowering trees, a sun shining like there is no tomorow, it almost feels like the summer is around the corner. But we all know this won't quite last as long as we wished it would. Because, as my grand'ma would say "au mois d'avril, ne te découvre pas d'un fil..."
It doesn't mean we should not enjoy it while it lasts. Personnaly, when the weather is like this, it feels like barbecue time to me. It's not something I have the chance to do much where I live, but I'm lucky enough to be able to do it at my parent's place.


A barbecue standard here, is the famous merguez sausage, which I've posted the recipe before, on this very blog. But grilling the sausage on the inside, is not the best option, unless you can do it with your widows open wide.
As it happens sometimes, I also had a craving for some good burger. I do not go to any of those famous fast food chains (just watch super size me...), but I love having my own american night at home, so why not bringing both together: spicy lamb patties in a soft bun.
Roasted potatoes, a burger, a good movie, the only thing missing is a diner waitress on roller skates serving me!

Spicy Lamb Burger with Lemon Caramelised Onions


For 2 Hamburgers

2 Hamburger Buns
4 Merguez Sausages (about 300gr)
3 Tablespoons of Bread Crumbs
3 New Onions
1 Lemon
1 Tablespoon of Sugar
1 Tomato
Ketchup
Olive Oil
Salt, Pepper

Open the sausage to take out the stuffing and place it in a bowl, add the bread crumbs and the lemon zests to it. Combine everything well and form two round patties, if needed, add some more bread crumbs. Place them in the fridge until you are going to use them.

Slice the onions finely. In a pan, put the onions, some olive oil, add salt, pepper and the sugar. On a medium heat let the onions caramelise slowly. When they are starting to be soft, add the juice of the lemon and let it cook for at least 20 minutes, until it has almost the consistency of jam. Set aside.

Cut your buns open, if you wish you can grill them (those had just been made, so I prefered to keep them soft). On the bottom, put some ketchup on the bun and place a thick slice of tomato on it.
In a griddle pan, start cooking slowly your patties, I would say about 6 to 7 minutes each side, but I like it well done.

When the patty is done, place it on the tomato and top it with some caramelised onions. Close your bun and enjoy it with some fries or roasted potatoes.