28/06/2012

Those Lazy Hazy Crazy Days of Summer


Sometimes I love having lazy days, today was -partly- one of these. I got up early but stayed in my pyjamas for hours, I took a nap after lunch, enjoyed a nice summer breeze behind closed shades.
While everybody was rushing outside to the summer sales, I was listening to the birds chirping outside on the trees, I live in a small town in a quiet cul de sac, and felt like I was in the shire.

Watching 12 episods of the "Gilmore Girls" was part of my day too, therefor the title of this post. While I have seen them all already (several times), I'm still enjoying every witty comment, quirky characters and pop reference of this show. Judge me all you want, I had a great day! But a great day can't be complete without some cooking.

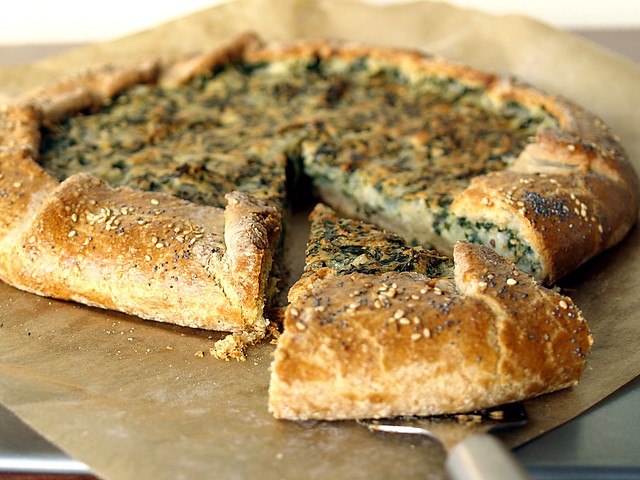
On this week's vegetables basket, we had some swiss chard, and I was in the mood for pie, at least something resembling it, so stumbling upon this recipe made the trick. The good thing with pie, is that you can adjust the recipe with what you have at hand and make it to your liking.
I'll definetly be making some more crostata in the future, so many ideas for sweet versions come to mind right now, oh wait... This is supposed to be a lazy day, let's do those some other time.

Swiss Chard Crostata (adapted from on a recipe from A feast for the eyes)


for the crust
300gr of Flour (T80 organic)
70gr of Parmigiano
125gr of Mascarpone
115gr of Butter
2 Eggs
1/2 a Teaspoon of Cayenne Pepper
1/2 a Teaspoon of Salt

for the filling
1 bunch of Swiss Chard (about 600gr)
2 Cloves of Garlic
Olive Oil
70gr of Comté, grated
70gr of Feta, in cubes
4 Tablespoon of Cream
100gr of Breadcrumbs
2 Eggs
Salt, Pepper, Cayenne Pepper
Sesame and Poppy seeds
1 Egg


In a food processor put the flour, the parmigiano, the mascarpone, the butter, the salt and cayenne pepper. Blitz until it gets to a crumble consistency and pour the 2 eggs down the funnel of your food processor, once the dough starts to form, tip is on a floured surface and make it into a ball.
Cover it with cling film and place in the fridge for at least 30 minutes.

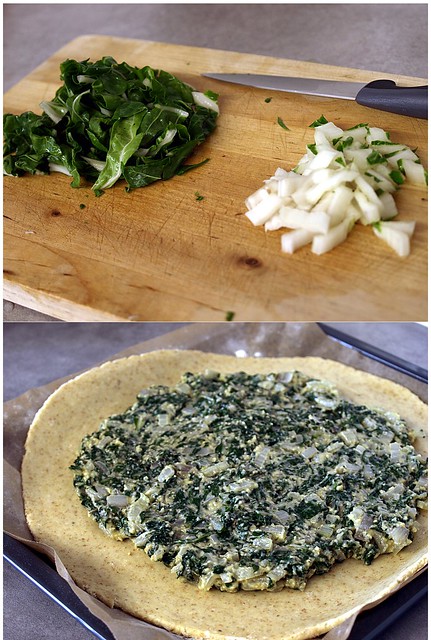
Clean the swiss chard, cut the stems apart from the green leaves. In one bowl, place the stems you have quite finely dices, and in an other place the greens roughly chopped.

In a big pan, heat up some olive oil with the garlic cloves that are peeled and cut into 2. Once the garlic has a nice golden color, remove it from the oil, season with some cayenne pepper.
Now add the swiss chard stems with a couple of tablespoons of water, let them cook and stir every now and than for about 7-8 minutes.
Add the swiss chard greens on top on them, and keep cooking for about 10 minutes. Set aside to cool for a while.

Drain the swiss chard from the excess liquid. In a bowl combine the swiss chard with the comté and feta cheeses, the 2 eggs, the cream and the breadcrumbs. Mix everything well together, if it's too liquid, add some more breadcrumbs. Check for seasoning, add salt and pepper to your taste.

Preheat the oven to 190°C.

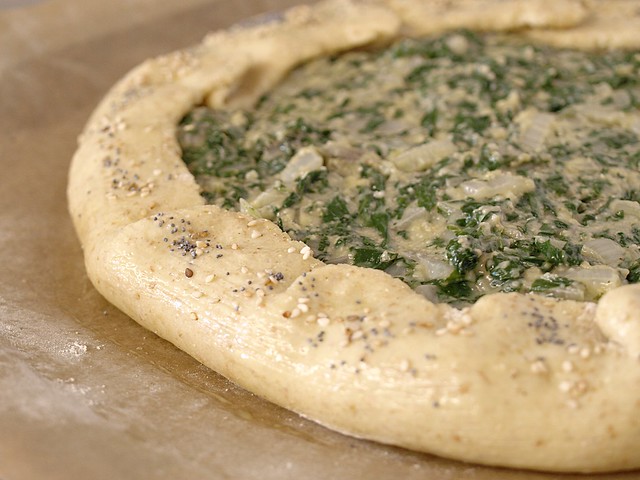
Roll out the dough on a parchement paper (about 35cm diameter) and place it on an oven tray. Pour your swiss chard mixture in the middle, even it out but leave a 5 cm space from the rim. Fold this rim on to the pie (look for the picture in case the explanation is not clear).

Make an egg wash with the remaining egg and a bit of water, brush the crust with it and sprinkle it with sesame and poppy seeds. Place it in the oven for 35-40 minutes, until the crust has a nice golden color. Serve hot or at room temperature.

27/06/2012

Daring Baker - June 2012 Challenge: Battenberg


Mandy of What The Fruitcake?! came to our rescue last minute to present us with the Battenberg Cake challenge! She highlighted Mary Berry’s techniques and recipes to allow us to create this unique little cake with ease.

It's this time of the month again... The daring baker challenge release day! This one is not a new one for me, I choose a chocolate Battenberg cake for my very first blog post recipe. Gosh, time goes by so fast when you're having fun.
Though I liked it a lot, I never came around to do it a second time (again, so many recipes, so little time). So to make a different one, I pick the traditional battenberg recipe proposed for this challenge, the other one included coffee, so the choice was easy to make.
Anyone who likes almonds can only love this cake. Plus it's a great looking cake, and personaly, what wins it over, is the apricot jam! Nothing with apricot can be bad in my book.

Traditional Battenberg (adapted from Mary Berry’s “Baking Bible”)


Servings: +- 8

Ingredients
¾ cup (1½ sticks) 175gm / 6 oz Unsalted Butter, softened & cut in cubes
¾ cup / 175gm / 6 oz Caster Sugar
1¼ cups / 175gm / 6 oz Self-Raising Flour
3 Large Eggs, room temp
½ cup / 65gm/ 2 1/3 oz Ground Almonds (Can be substituted with ground rice)
3/4 tsp / 3½ gm Baking Powder
½ tsp / 2½ ml Vanilla Extract
1/4 tsp (1¼ ml) Almond Extract
Red Food Colouring, paste, liquid or gel
To Finish
1/3 cup (80 ml) 100gm /3 ½ oz Apricot Jam
1 cup / 225gm / 8 oz Marzipan, natural or yellow

Directions:
1. Preheat oven to moderate 350°F/180°C/160°C Fan Assisted/Gas Mark 4
2. Grease an 8”/20cm square baking tin with butter
3. Line the tin with parchment paper, creating a divide in the middle with the parchment (or foil)
4. OR Prepare Battenberg tin by brushing the tin with melted butter and flouring
5. Whisk together the dry ingredients then combine with the wet ingredients in a large bowl and beat together just until the ingredients are combined and the batter is smooth
6. Spoon half the mixture into the one side of the prepared baking tin
7. Add a few drops of red food liquid/gel/paste to the remaining batter, stir until the colour is thoroughly distributed, add more colour if needed
8. Spoon the pink batter into the other half of the prepared baking tin
9. Smooth the surface of the batter with a spatula, making sure batter is in each corner
10. Bake for 25-30mins until the cake is well risen, springs back when lightly touched and a toothpick comes out clean (it should shrink away from the sides of the pan)
11. Leave to cool in the tin for a few minutes before turning out to cool thoroughly on a wire rack
12. Once completely cool, trim the edges of the cake with a long serrated knife
13. Cut each coloured sponge in half lengthways so that you are left with four long strips of sponge
14. Neaten the strips and trim as necessary so that your checkered pattern is as neat and even as possible
15. Gently heat the apricot jam and pass through a small sieve
16. Brush warmed jam onto the strips of cake to stick the cake together in a checkered pattern (one yellow next to one pink. On top of that, one pink next to one yellow)
17. Dust a large flat surface with icing sugar then roll the marzipan in an oblong shape that is wide enough to cover the length of the cake and long enough to completely wrap the cake
18. Brush the top of the cake with apricot jam
19. Place the cake on the marzipan, jam side down
- Tip: Either in the middle or to the one side of the marzipan
20. Brush the remaining three sides with jam
21. Press the marzipan around the cake, making sure the join is either neatly in the one corner, or will be underneath the cake once turned over
- Tip: If you put the sponge to the one side of the marzipan, I found it easiest to "roll" the sponge over and over onto the marzipan instead of lifting the marzipan up onto the sponge
22. Carefully flip the cake over so that the seam is under the cake and score the top of the cake with a knife, you can also crimp the top corners with your fingers to decorate
23. Neaten the ends of the cake and remove excess marzipan by trimming off a small bit of cake on both ends to reveal the pattern

24/06/2012

American Party


Have you noticed that time flies faster once you turned into an adult? As a child, you always think everything takes too long: the car trip to go on holidays, the queue at the supermarket, getting to the age where you get to pick your own clothes...
But now, it feels like the weeks, months and even years go by so quickly. Recently, I watched an episod of a TV show I loved as a kid (and still do actually), it was an episod of the first season of the X-files, and I realised it was almost 20 years old! Gosh, it can't be...

Some reminders are here to have us keeping track: new years eve, the start of the school year and birthdays. I've recently "gained experience" (sounds better than "getting older" now, doesn't it?) and take great pleasure into cooking for my family on that day.
I like making it into a theme diner, last year was mexican, this year is american. It had the advantage to please the kids and grow ups and gave me enough choices to pick from.


So the obvious choice for the food, after a quick survey: hamburgers, hot dogs, corn on the cob, potatoes, coleslow, marinated pork ribs. Being used to cook in small quantities, I feel like I'm running a restaurant/bakery on that day. The buns have been home made, using the recipe I already posted here for hamburger buns. I thought I'd share the one for the Hot Dog buns that turned out to be good too.
And to cheer with this food, how about a "Fuzzy Navel"? I can be made with peach sirop for a virgin version. And for desert, a cheesecake or some brownies will do the trick.

Hot Dog Buns (Based on a recipe from Le Petrin)


For 12 Buns

850gr of Flour
1 Pack of Dried Yeast
8gr of Salt
20gr of Sugar
2 Whole Eggs + 1 Yolk
30gr of Butter, at room temperature
250ml of Soy Milk
200ml of Water
Poppy Seeds

I've used my Kitchenaid with the dough hook to bring the dough together. So, in the bowl of your standmixer, combine the flour with the yeast, the salt and the sugar.
Make a well into the mixture and crack 1 egg and add the yolk, the milk and the butter cut in little cubes, start mixing very slowly for about 2 or 3 minutes, than start adding the water, little by little (you may not need it all, depending on the flour) and keep mixing until you have a dough that forms.
Tip the dough on your working surface, and keep knitting for about 5 minutes, until it's smooth, shiny and elastic.

Place the dough in a bowl and cover it with cling film, leave for 1 hour and a half. Passed this time, bring the dough back to it's original size, tip it on a floured working surface and divide in 12 equal parts, cover with a clean cloth and leave them for 5 minutes.

Form the buns, roll them out to form a cylinder of about 15cm. Line 2 oven tray with parchement paper and place the hot dog buns on them, 6 per tray. Place a damp cloth over the trays, and leave the buns to rise under it for 1 hour.

Preheat the oven to 180°C.

Make an egg wash with the remaining egg, brush the buns carefully with it and spread some poppy seeds on top. Place in the oven for about 15 minutes, until golden brown. Leave on a rack to cool.

16/06/2012

Pasta and Cheese, some other way


I don't have much of a green thumb. I killed a cactus once, but only with good intention: I gave it too much water... In my defense it did look dry. (Now i'm wondering if I already told that story... Gosh my brain is fried these days).
But I really want to make it better and improve. So now that I have some space outside, I started a little herb garden. With mixed results so far, but it's really nice to cut some fresh herbs and directly add them to a dish.
I'm also looking forward for some cherry tomatoes that my mum gave me. They start to blossom, so I'm keeping my fingers crossed for some red delicious vegetables (well, technically, fruits...).

Though I now make most of my pastas, I still like to buy the ones with a shape that I'm not skilled enough to form by myself, like those conchiglioni. A huge sized pasta in the shape of a shell to fill up with, for instance, a ricotta spinach mixture.
Here I wanted to use the fresh herbs with some goat cheese for a try. It's really not a "light" dish, I would advice you to go easy with the filling, even if it feels funny to dine on, literally, 4 pastas, it's plenty enough with a salad on the side.

Conchiglioni with Goat Cheese and Herbs Stuffing


serves 2

8 Conchiglioni (depending on the size)
100gr of Fresh Goat Cheese
4 Tablespoons of Freshly chopped Herbs (Minth, Sage, Chive, Rosemary, Thym...)
30gr of Parmigiano
Olive Oil
Pepper

Cook the pasta according to the instruction on the package, about 18 minutes in boiling salted water in this case. Be careful to stir every now and than, so it doesn't stick.
Drain the pasta in a colander, and pour cold water over them to stop them from cooking.

Preheat the oven to 180°C.

Put all the herbs on a cutting board, and using a mezzaluna, chop them finely. Combine them with the fresh goat cheese. I wouldn't put any salt, as goat cheese is salty already, maybe a little bit of pepper, but try it and season it to your tastes.

Using a spoon, fill the conchiglioni with the cheese, not all the way up, and place them in an oiled oven dish. Grate the Parmigiano on top and place it in the oven for about 10 minutes. Serve with a green salad.

10/06/2012

Asparagus, Parmigiano, Eggs, Part 2


Though I don't like reality shows at all, I do admit having a guilty pleasure watching "Top Chef" (I'm pretty sure there is a franchise of that tv show in many countries). They do keep the sensational/emotional vibe to a minimum, and it actually includes real chefs, real recipes, real advices and tips.

The challenges that the contestants face every week get harder and harder, and what I find to be interesting, is to see what every one of them creates with the same ingredients. You can see each and every one's sensibility and creativity. I find it amazing to see how different the results are, the only thing missing, is to be actually able to taste them.


I guess the key is to find the right combination of ingredients. Hoping not to be too redundant, this recipe includes again asparagus, parmigiano and eggs, just in a different way. I was left with asparagus cream broth from my last recipe that I didn't want it to go to waste.
This can be eaten hot for a nice meal, aswell as cold, sliced for an appetizer. It has a nice asparagus taste without it's texture, so maybe it would work nicely on children. This is the last asparagus recipe I promise... For this season at least!

Asparagus Crêpes


For 10 Crêpes/Pancakes

300gr of Asparagus
300ml of Water
200ml of Soy Cream
3 Eggs
200gr of Flour
3 Tablespoons of Fresh Chives, chopped
1/2 Teaspoon of Bicarb
Oil
Salt, Pepper
Parmigiano, to taste

Clean and peel the asparagus. I didn't use the asparagus heads in this version, because it's the broth from a previous recipe that is used, flavoured with the peels. But for more taste, if you don't do the broth from the start, I would use the whole asparagus, diced into cubes.

In a pan on a middle heat, add the water and the soy cream with a little bit of salt. Place the asparagus cubes into it, let it bubble for about 10 minutes. Using a hand mixer, or a blender, mix everything well together. Set aside and let it cool a little.

In a bowl, beat the 3 eggs and add the asparagus mix, using a whip combine everything well. Sieve in the flour slowly to avoid lumps. Add the bicarb, the chives and season with pepper. When everything is well combined, leave it to rest for about 30 minutes.

Heat up a non-sticky frying pan on a medium heat, with a little bit of oil. When the pan is hot enough, using a ladle, pour in the batter and tilt the pan in a circular movement to spread it, like you would for a crêpes. Cook it for about 3-4 minutes on one side, and tilt over for about 1 minute on the over one.

If you want to eat them hot, serve immediately and grate parmigiano over the crêpes. Otherwise, leave them to cool, and grate the parmigiano before rolling them and cutting them into about 1cm portion.

03/06/2012

Asparagus Clafoutis


It's this time of year again: asparagus season! Around here it's in the spring trilogy: rhubarb, strawberries and asparagus. Now that I've overcomed my childhood trauma, I can actually cook them everynow and than. Afterall, they're only in season for a few more weeks here.

Now the fun part for me, is to find a way to prepare them, that isn't the "traditionnal" one here: cooked in water and served with a sauce and some ham. Coming across a recipe from the chef Eric Frechon in a magazine, I thought this might be a nice change.

What I found very interesting in this recipe, is that every part of the asparagus got to be used in the process, from the peels to the head. This attention to details and more elaborated recipe is the touch of a chef that got his 3rd Michelin star in 2009.

I think I'll try more in the future to include all the parts of the vegetables that are used in a recipe, at least this way there will be less waist. The other nice discovery here is the combination of asparagus with parmigiano, that will be used again in a recipe (most likely soon on this blog), because they go very well together.

Asparagus Clafoutis
(based on a recipe from Eric Frechon in Cuisine et Vins De France N°145)


Serves 2

300gr of White Asparagus
4 Eggs
25cl of Soy Cream
100gr of Parmigiano Reggiano, freshly grated
Butter
Salt, Pepper
Water

Preheat the oven to 160°C. Butter your oven dish.

Clean and peel the asparagus, keep the peels. Cut the asparagus in 3 parts: add the end part to the peels, dice the middle part into small cubes and set the head aside.

In a big pan place the peels and the end part and cover them with water, salt a little and let it bubble for about 10 minutes.

Using a skimmer, take out the peels and end parts, you won't need them anymore. Place the asparagus heads in the broth, still bubbling, and let them cook for about 4 minutes. Still using the skimmer, take them out carefull and set them aside.

Now add the soy cream and the diced asparagus in the broth, let it cook for about 10 minutes. After that time, using a plonging mixer, off the heat, mix the broth.

In a bowl, beat the eggs together, add about 4 ladle of the broth (200 to 300ml). Season with pepper and add the parmigiano at this stage.

In the oven dish that you have buttered, place the asparagus heads on the bottom, and pour over it the eggs and broth mixture. Place in the oven for about 50 minutes, it should look a little like a soufflé in the end and have a nice golden top.

Serve hot or at room temperature, with a salad or fancier, with some morels and cream.